Walkthrough editors
Block Out Levels 1001-1004: Four Corner Trays, Split Twin Columns and Six Gem Shelves Past the Thousand Mark
Block Out Levels 1001-1004: 1001 puts trays of 13, 20, 5 and 26 in the four corners around a gem-centred board, 1002 runs a narrow left field past two tall trays of 14 and 9, 1003 lines up six gem-badged shelves with 21, 40 and 31 between the rows, and 1004 pairs trays of 10 and 16 with a tall field that clears from the top arrow, with previews and video solutions for every level.
Related video walkthroughs
The library now runs to Level 1004. 1001 through 1004 went up as one batch, all four rated Expert, and each one has a page on the site plus a video solution on YouTube. The previous batch was 998-1000, so this picks up right after the thousand mark.
Four boards, four different ways of spreading storage around the field. 1001 hides its trays in the corners and leaves the numbered edge slots to decide the route; 1002 gives the field only the left third of the board and hands the rest to two tall trays; 1003 builds a column of six gem shelves in the middle; 1004 sets two trays on the right against a field that clears from a single top arrow. On all four the numbered slots on the border, not the big trays, set the order.
Levels 1001-1004 at a glance
| Level | Difficulty | Walkthrough | Video |
|---|---|---|---|
| Level 1001 | Expert | Open the guide | Watch |
| Level 1002 | Expert | Open the guide | Watch |
| Level 1003 | Expert | Open the guide | Watch |
| Level 1004 | Expert | Open the guide | Watch |
The four newest boards
Each entry below has the board preview, a link to its own page and the video solution. Watch only as far as the first tray completing, then restart and replay that part yourself before watching the rest.
Level 1001
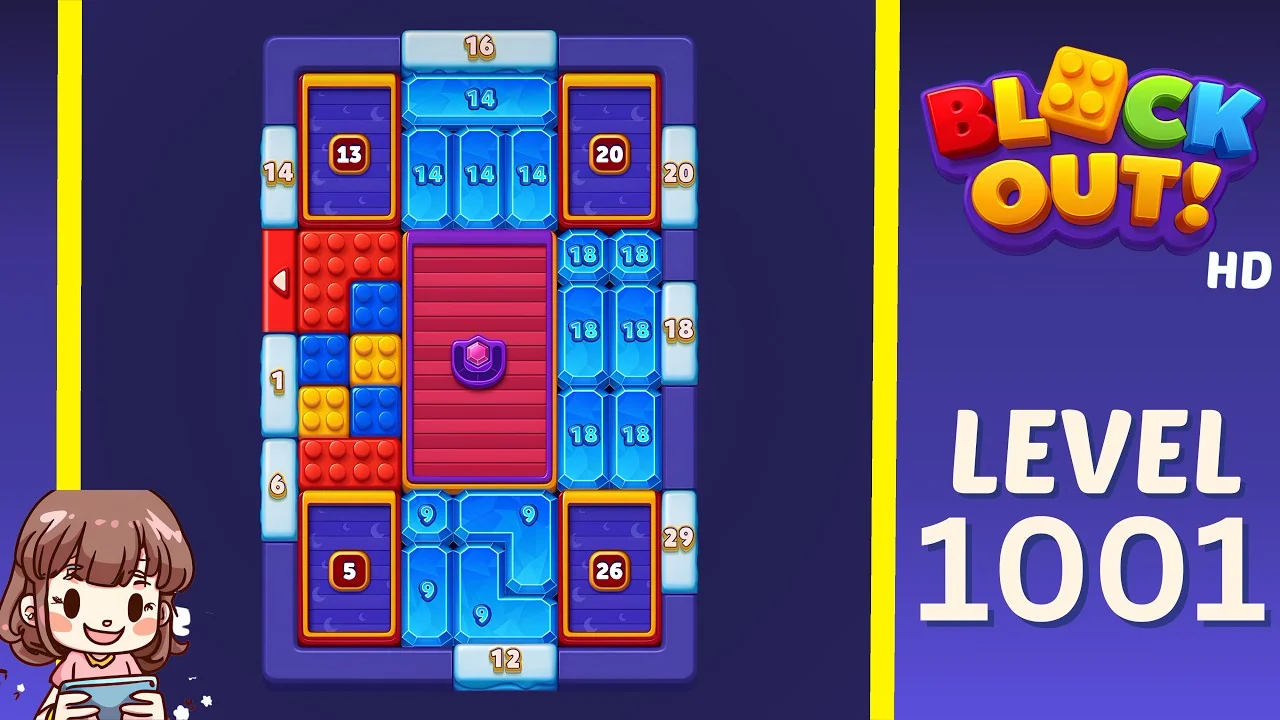
Open the Level 1001 walkthrough or watch the video solution on YouTube.
The four corner trays frame the field: a purple tray marked 13 at the upper left, a 20 at the upper right, a 5 at the lower left and a 26 at the lower right. Between them the board is all field. Across the top sits a wide blue row marked 14 with four cyan cells marked 14 under it; the middle is a tall maroon column with a purple gem badge in its centre; the left side holds a red brick field with a white left arrow and a column of yellow and blue squares; the right side is six blue cells marked 18 in two columns of three; the bottom is four blue cells marked 9 set in a U. Border counters read 16 along the top, 14 on the upper left, 20 on the upper right, 1 and 6 down the lower left, 18 on the right, 29 on the lower right and 12 along the bottom. The left arrow is the only direction marker, so the red brick block drains first and everything it releases has to fit the 1 and 6 slots or the 13 and 5 trays. The two gem-columns (the 18s and the 9 U) are the last colours; keep the 5 and the 1 for them.
Level 1002
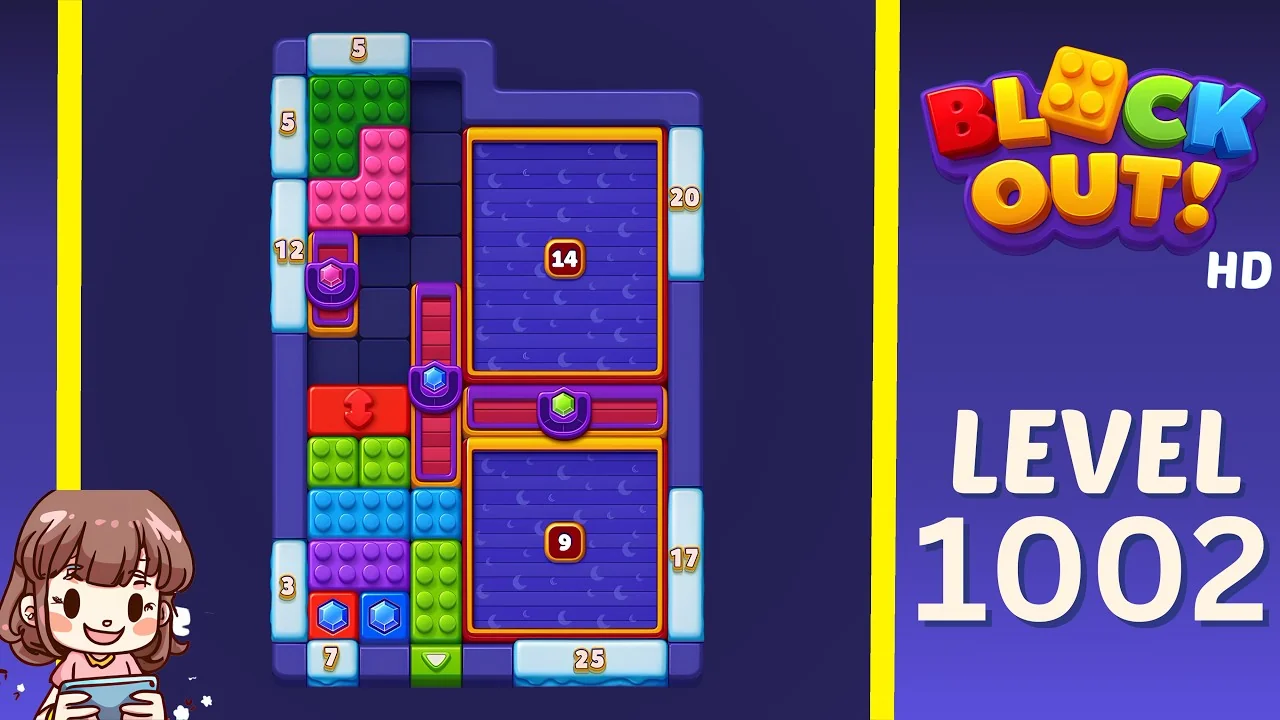
Open the Level 1002 walkthrough or watch the video solution on YouTube.
This board is split down the middle: a narrow field on the left and two tall purple trays on the right, marked 14 on top and 9 below, with a narrow red horizontal tray carrying a green gem between them and a red vertical strip with pink and blue gems down their left edge. The field runs green bricks at the top, pink squares below, a red brick row with a left arrow, another green run, then blue and purple rows with a pair of blue gems at the base and a green down arrow on the bottom edge. Two small gem slots sit in the field itself, a pink gem in a purple frame near the upper left and a blue gem in a purple frame near the lower middle. Border counters read 5 along the top, 5 on the upper left, 12 and 3 down the left, 7 on the bottom left, 20 on the upper right, 17 on the right and 25 along the bottom. The 5 and the 3 are the tightest slots on the board, so the greens and pinks leaving the top of the field want the 12 and the 14, not the 5. The 9 is the deep catch-all and should only see the last two colours.
Level 1003
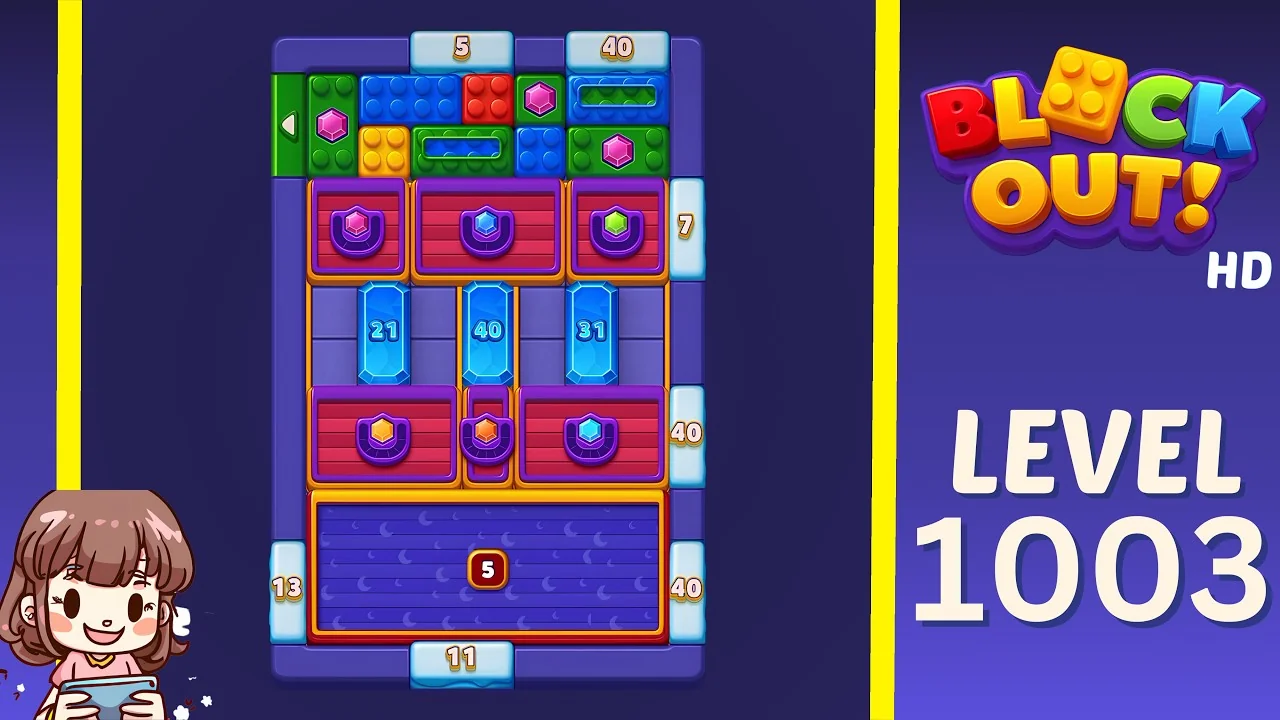
Open the Level 1003 walkthrough or watch the video solution on YouTube.
Six purple shelves sit in two rows of three across the middle of the board, each one carrying a gem badge: pink, blue and green on the upper row, yellow, orange and cyan on the lower row. Between the rows are three tall cyan cells marked 21, 40 and 31. The field is above them, a single dense band: a green left arrow on the edge, a pink gem in the upper left, blue circles, red bricks, yellow and orange squares, a second pink gem on the right, green bricks and two blue window bars set into the band. Below the shelves a wide purple field marked 5 runs the full width. Border counters read 5 and 40 along the top, 7 on the upper right, 40 on the right, 18 on the lower left, 40 on the lower right and 11 along the bottom. With six shelves the storage is generous but the throat is narrow: everything from the upper field passes the 21/40/31 column, and the 40 is large enough to swallow two colour families before it closes. The wide 5 at the bottom is the last outlet, not the first.
Level 1004
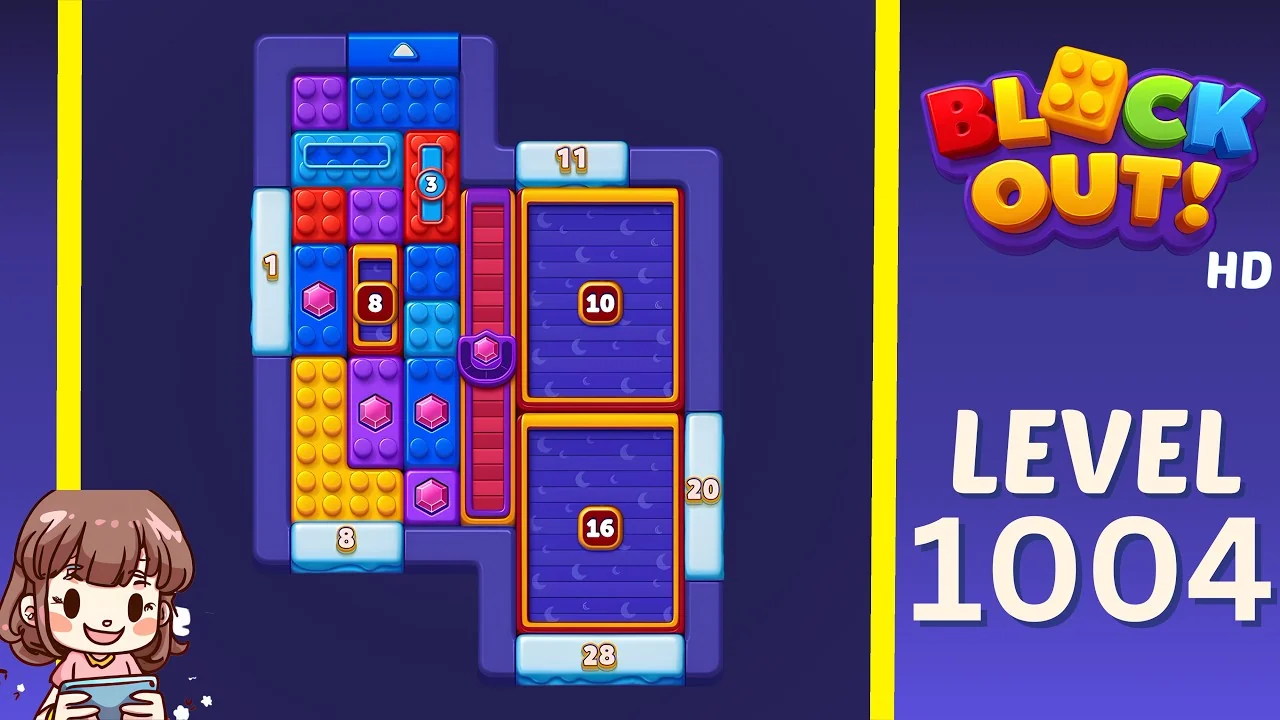
Open the Level 1004 walkthrough or watch the video solution on YouTube.
Two purple trays of 10 and 16 sit on the right, split by a red horizontal band with gold trim, and a red vertical strip carrying a purple gem badge runs down their left edge. The field takes the rest of the board and clears from a blue up arrow on the top edge: purple and blue squares at the top, a blue window bar with a 3 slot, red bricks, a cyan frame with an 8 slot, a second purple and blue run, yellow bricks, orange squares and pink gems along the lower half. Border counters read 11 along the top, 1 on the left, 8 on the lower left, 20 on the right and 28 along the bottom. The three small slots (3, 8 and the 1 on the left edge) sit closest to the field, so they take the first clears; the 10 and 16 should be loaded only after a colour family is clean enough to fill a whole tray. The up arrow means the top of the field drains before the bottom, which leaves the yellow and pink run for the 28.
What to watch for on these boards
The videos are verified solves, not scripts. The useful part is the shape of each board:
- Corner trays leave the edges in charge. On 1001 the 13, 20, 5 and 26 are far from the field, and the 1, 6, 12 and 29 slots do the early work.
- A narrow field drains in one direction. On 1002 the left arrow and the green down arrow mean the field empties in two passes, so the top colours cannot wait for the bottom.
- Six shelves still share one throat. On 1003 the 21, 40 and 31 column is the only route out of the upper field, so the shelf order matters more than shelf size.
- A single arrow sets the whole order. On 1004 the up arrow means every clear starts at the top edge, and the 3 and 8 slots are the first things to fill.
- Small numbered slots are outlets, not storage. The 1 and 6 on 1001, the 3 and 5 on 1002, the 7 and 18 on 1003 and the 1, 3 and 8 on 1004 only take a handful of pieces each.
How to use the walkthroughs
Every level from 1001 to 1004 has its own page with the board preview, difficulty rating and embedded video. A method that holds up on Expert boards:
- Watch only up to the first tray completing.
- Restart and replay that opening yourself.
- Keep going alone until you stall.
- Rewatch from the point your route went wrong, not from the start.
Browse all Block Out levels for the full library, or go back to the 998-1000 log if you are still working through the previous batch.