Walkthrough editors
Block Out Levels 998-1000: Split Storage, a Cross of Trays and a Gem Stack at the Thousand Mark
Block Out Levels 998-1000: 998 puts trays of 11, 16 and 22 under a field with two 2-capacity pockets, 999 arranges 15, 24, 13 and 9 in a cross above a wide field, and 1000 closes the run with three gem-badged belts, three narrow slots and a crowded bottom board, with previews and video solutions for every level.
Related video walkthroughs
The library now runs to Level 1000. 998 through 1000 went up as one batch, all three rated Expert, and each one has a page on the site plus a video solution on YouTube. The previous batch was 994-997, so this picks up where that run ended.
Three boards, three different storage plans. 998 keeps the field on top and drops a block of trays underneath; 999 arranges four trays in a cross so the largest one sits in the middle of the board; 1000 stacks its storage in a tall tower with three gem badges at the top and three narrow slots at the bottom. On all three the first tray you commit to still decides where the rest of the board drains.
Levels 998-1000 at a glance
| Level | Difficulty | Walkthrough | Video |
|---|---|---|---|
| Level 998 | Expert | Open the guide | Watch |
| Level 999 | Expert | Open the guide | Watch |
| Level 1000 | Expert | Open the guide | Watch |
The three newest boards
Each entry below has the board preview, a link to its own page and the video solution. Watch only as far as the first tray completing, then restart and replay that part yourself before watching the rest.
Level 998
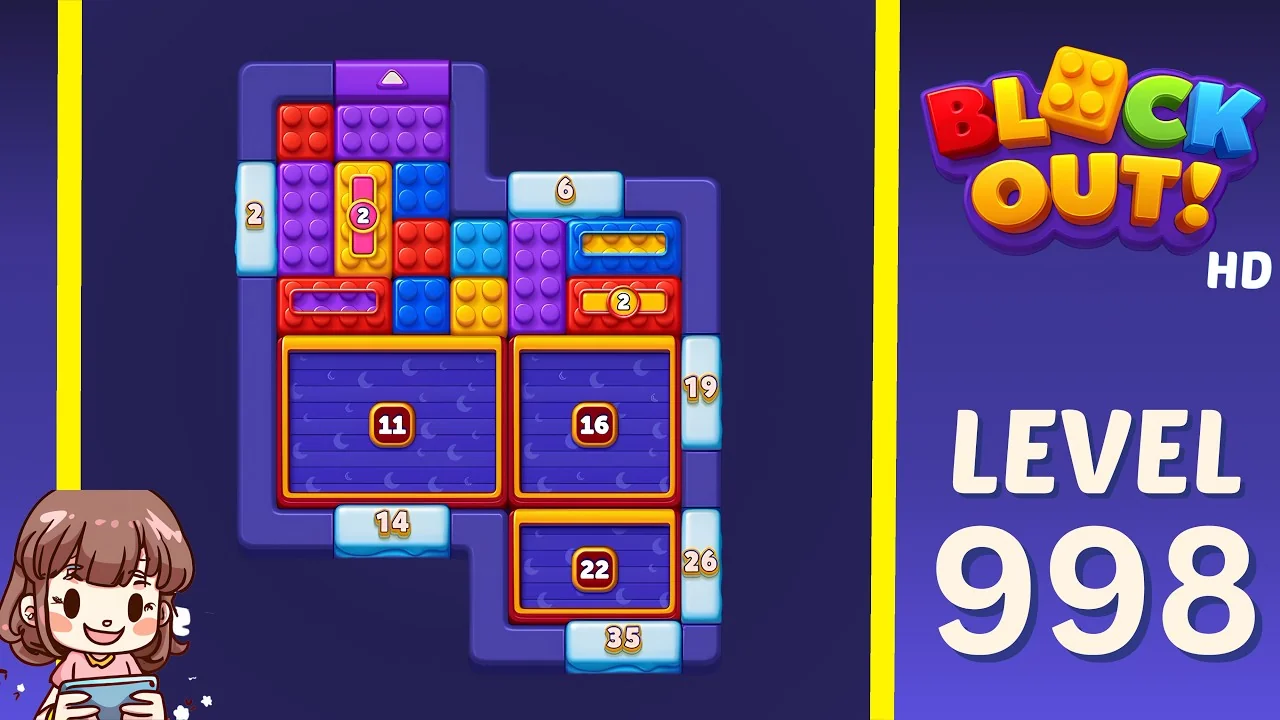
Open the Level 998 walkthrough or watch the video solution on YouTube.
The field fills the upper half and the storage sits in a block of three trays beneath it. A wide tray marked 11 runs under the left of the field, a bigger tray marked 16 sits beside it, and a tray marked 22 hangs below the 16 on the right. Two small capacity-2 pockets are set into the field itself: a yellow vertical one at the left-centre with a pink inner slot, and a horizontal red one on the right edge. Counters read 2 on the outer left, 6 on the upper right shoulder, 19 and 26 down the right side, 14 below the 11 tray and 35 below the 22. The field is a dense L: a red 2x2 at the top left, long purple bars down the left, blue columns in the middle, a gold-studded blue block and a gold-studded red block on the right, with a yellow 2x2 and a purple column closing the lower edge. The 11 and the 16 face the same stretch of field, so they take the same first clears; split them by colour family early. The 22 only opens toward the bottom right, and the two 2s should be treated as outlets for the last two colours, not as spare storage.
Level 999
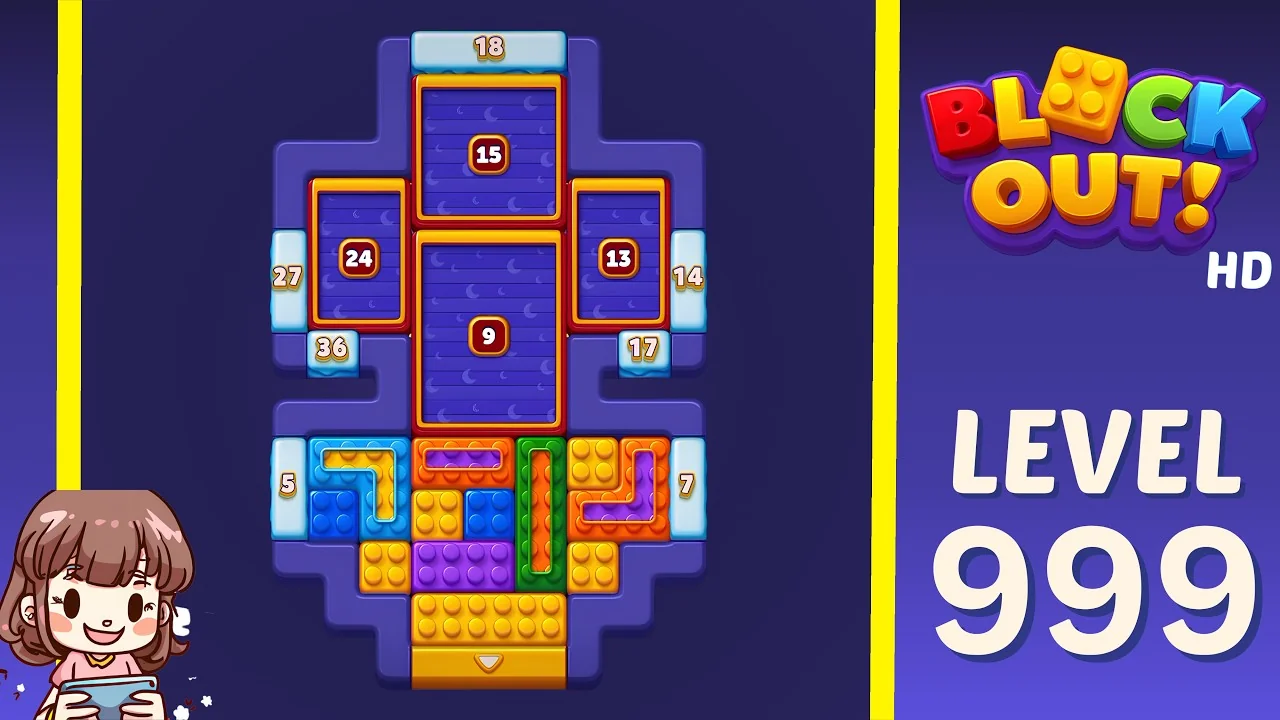
Open the Level 999 walkthrough or watch the video solution on YouTube.
Four trays form a cross above a wide field. A wide tray marked 15 sits at the top, a tall tray marked 24 on the left, a tall tray marked 13 on the right, and the largest tray marked 9 fills the centre below the 15. Counters read 18 along the top, 27 down the left, 36 and 17 on the inner shoulders, 14 down the right, 5 on the far lower left and 7 on the far lower right. The field is the dense band at the bottom: a blue L with gold studs in the upper left, orange and purple squares beside it, a red-orange block in the middle left, a green vertical strip on the centre right, a purple row and an orange U on the right, yellow bricks across the bottom and a gold strip with a down arrow along the lower edge. The 9 is the catch-all: everything that drops through the middle of the band reaches it, so keep it for the mixed colours. The 15 only sees the top clears, and the 24 and 13 are mirrored side lanes that want separate colour families - load the 15 first while the top of the field is still clean.
Level 1000
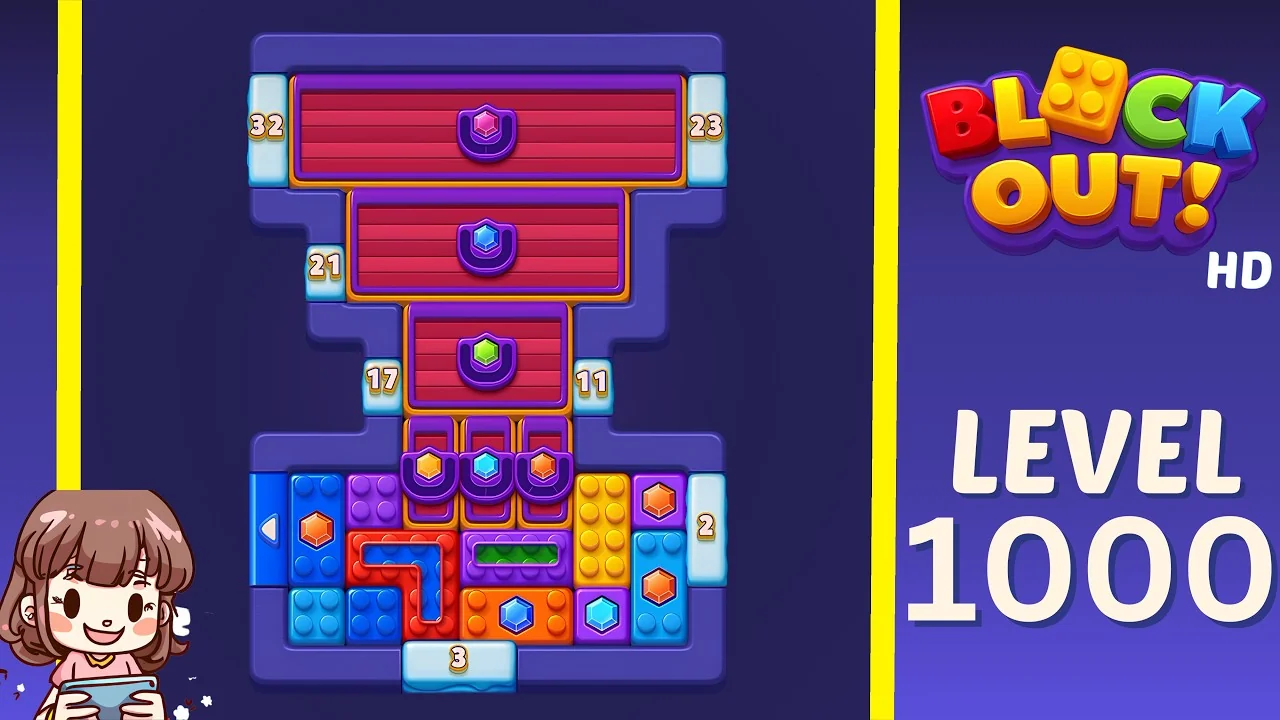
Open the Level 1000 walkthrough or watch the video solution on YouTube.
The thousandth board is a tower. Three wide belt trays are stacked at the top, each carrying a single gem badge - pink at the top, cyan in the middle, green on the lowest belt - and three narrow vertical slots holding gold, cyan and orange hex tokens sit directly below them, between the tower and the field. Counters read 32 on the outer top left, 23 on the outer top right, 21 and 17 down the left of the tower, 11 on the right beside the lowest belt, 2 on the lower right and 3 along the bottom. The field is the crowded band at the base: a blue bar with a left arrow on the far left, blue and purple squares, an orange gem in a blue frame, a red L wrapped around a blue inlay, a gold-studded green strip set into a purple row in the middle, a yellow column on the right with orange gems in purple frames, and cyan gems on the lower right. The tower has the most storage but the longest throat: every clear has to pass the 17/11 gap or the 21 shoulder before it reaches a belt. Work the field from the left arrow inward, send the first colour family up the 17 side, and keep the 2 and the 3 for the final two colours.
What to watch for on these boards
The videos are verified solves, not scripts. The useful part is the shape of each board:
- Trays that share an edge share their clears. The 11 and 16 on 998 both face the same field, so a mixed opening wastes whichever one fills first.
- Small numbered pockets are outlets, not storage. The two 2s on 998 and the 2 and 3 on 1000 only take a couple of pieces each and are easy to poison early.
- A tray in the middle of the board is the catch-all. On 999 the 9 sits under the centre of the field and receives every middle clear, so it cannot be reserved for one colour.
- Distance costs more than capacity. On 1000 the three belts are the largest storage but the furthest from the field; the narrow slots and the 17/11 gap decide the order, not the belt sizes.
- A left arrow sets the sweep direction. On 1000 the field clears from the left edge inward, which leaves the right-hand gems for the narrow slots.
How to use the walkthroughs
Every level from 998 to 1000 has its own page with the board preview, difficulty rating and embedded video. A method that holds up on Expert boards:
- Watch only up to the first tray completing.
- Restart and replay that opening yourself.
- Keep going alone until you stall.
- Rewatch from the point your route went wrong, not from the start.
Browse all Block Out levels for the full library, or go back to the 994-997 log if you are still working through the previous batch.