Walkthrough editors
Block Out Levels 908-913: Six Expert Boards Built Around Wide Trays and Narrow Channels
Block Out Levels 908-913: six Expert boards with wide trays, narrow channels, board previews and video solutions for each level.
Related video walkthroughs
The library stops at Level 913 now. 908 through 913 went up as one batch, all six rated Expert, and every one of them has a video walkthrough on the site and on YouTube. The previous batch was 902-907, so this picks up exactly where that run ended.
These six boards share a pattern that the earlier Expert batches did not lean on quite so hard: the big trays got bigger and the openings that feed them got smaller. Counts of 25, 31 and 36 sit in trays that can only be reached through a channel one block wide, or past a slider that has to be moved out of the way and then put back. On most of these boards the tray is not the puzzle. The door to the tray is.
Levels 908-913 at a glance
| Level | Difficulty | Walkthrough | Video |
|---|---|---|---|
| Level 908 | Expert | Open the guide | Watch |
| Level 909 | Expert | Open the guide | Watch |
| Level 910 | Expert | Open the guide | Watch |
| Level 911 | Expert | Open the guide | Watch |
| Level 912 | Expert | Open the guide | Watch |
| Level 913 | Expert | Open the guide | Watch |
The six newest boards
Each entry below has the board preview, a link to its own page and the video solution. Watch the video only as far as the first tray completing, then restart and replay that part yourself before watching the rest.
Level 908
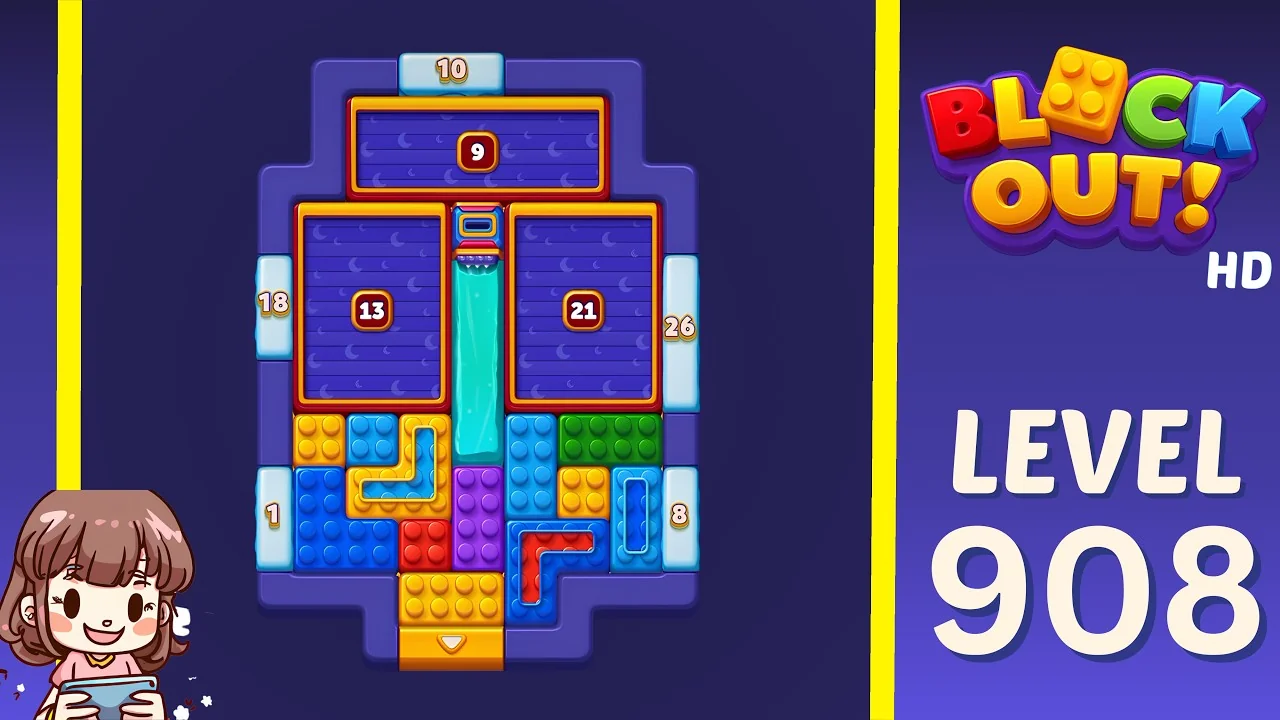
Open the Level 908 walkthrough or watch the video solution on YouTube.
A 9-tray sits at the top under a 10-counter, and below it two large boards at 13 and 21 are split by a narrow vertical channel that runs all the way down the spine. That channel is the only way blocks reach either big tray. The side counters at 18 and 26 on the flanks are far looser than the trays, so they will happily accept the blocks you should be saving for the 21. Feed the 21 first, while the channel is clear and the left board is still full.
Level 909
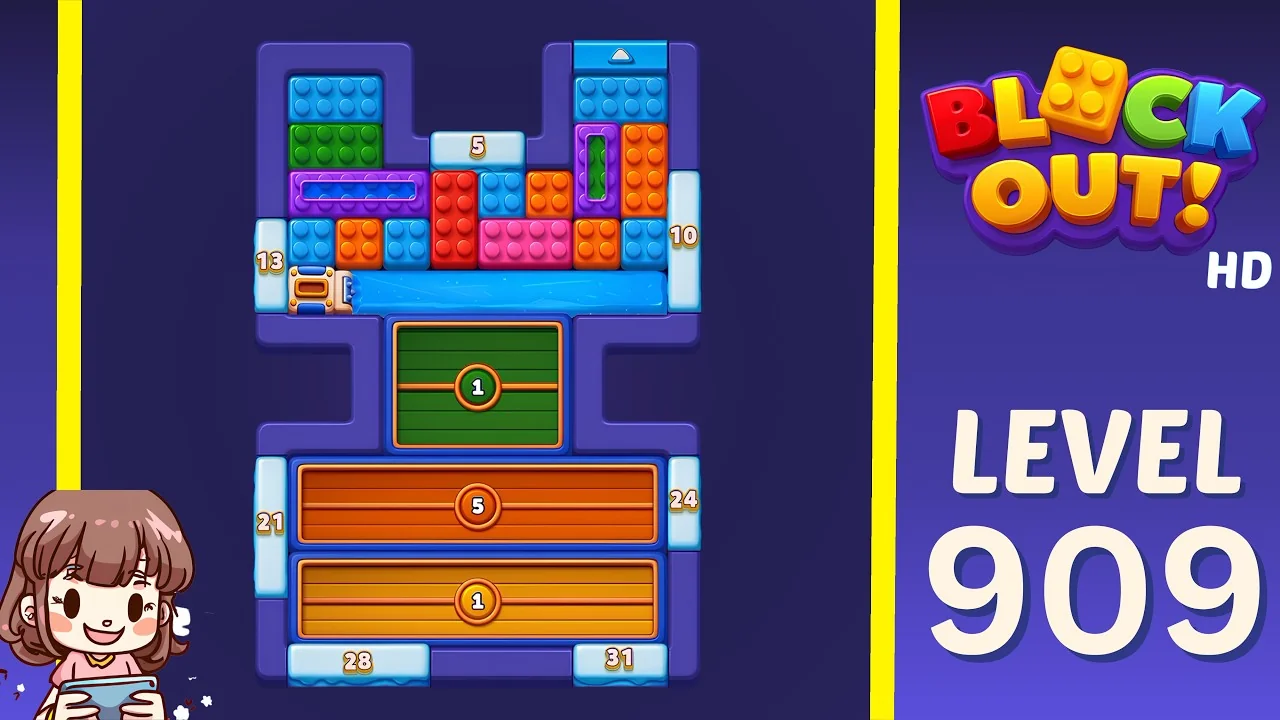
Open the Level 909 walkthrough or watch the video solution on YouTube.
This one reads almost like two levels stacked: a tight block field up top around a 5-tray, side counters at 13 and 10, then a blue slider bar cutting across the middle with an isolated green 1-tray below it, and two orange trays at 5 and 1 further down. The slider bar is a one-way door — once it moves, the route behind it changes shape. Take the top field apart before you touch it, and leave the 1-trays for the very end.
Level 910
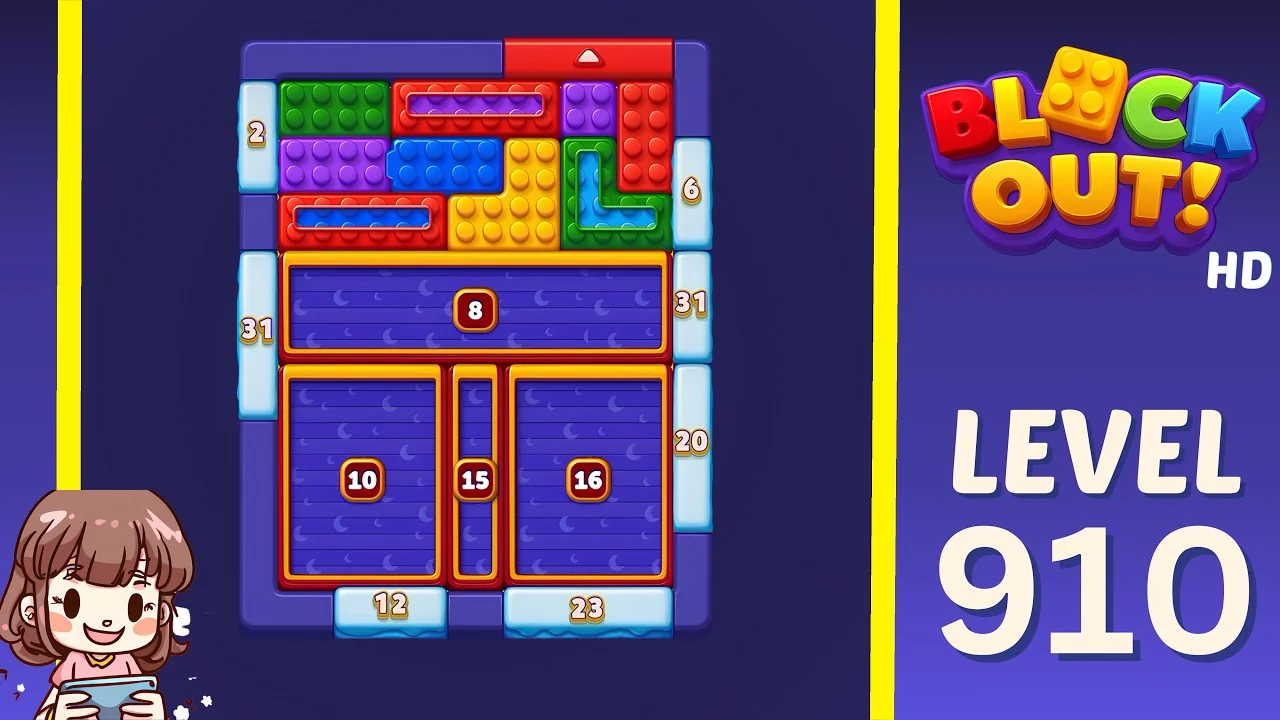
Open the Level 910 walkthrough or watch the video solution on YouTube.
Small counters at 2 and 6 flank the top, then the board opens into four large trays: a wide 8 in the middle, and 10, 15 and 16 below it, with side counters at 31, 31 and 20 and a red slider at the very top. The 8-tray spans the full width, so any block that reaches the middle of the board can drop into it. That makes it the fastest tray to finish and the one most likely to close a route early. Start the 16 and 15 first and treat the 8 as overflow.
Level 911
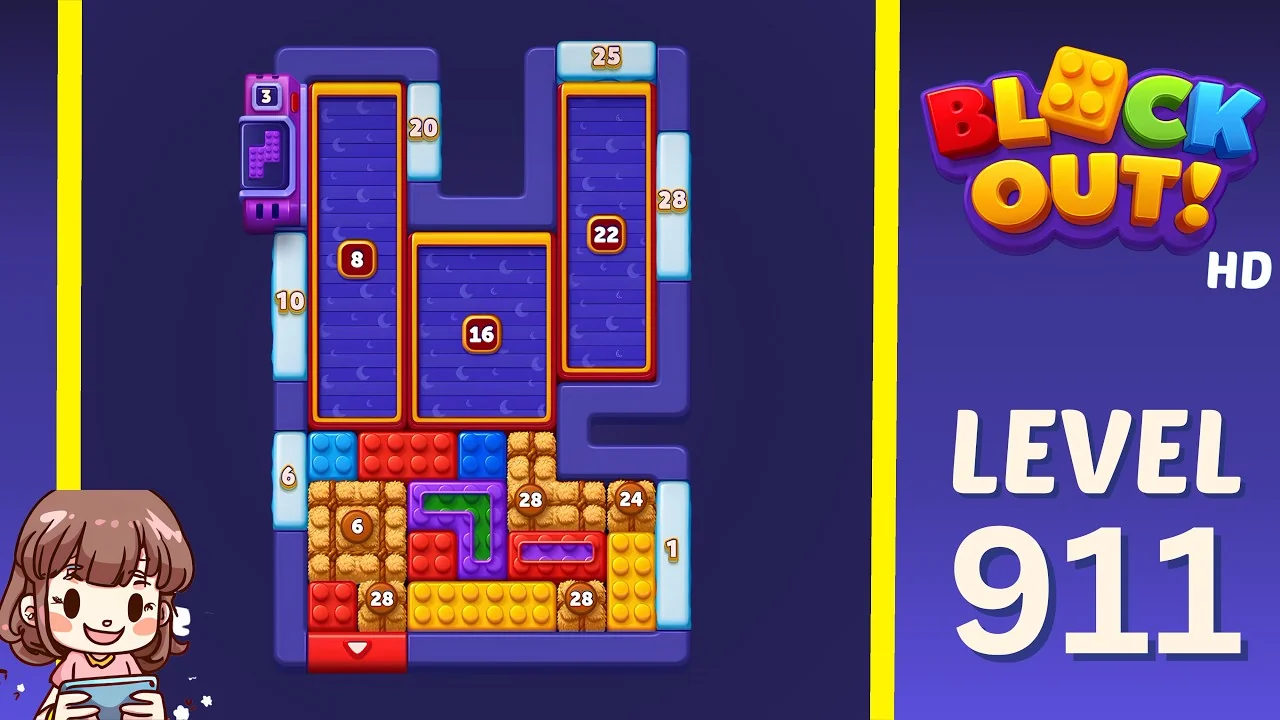
Open the Level 911 walkthrough or watch the video solution on YouTube.
Three tall trays at 8, 22 and 16 sit across the top of this board, with a 3-count lever tucked into the top-left corner and a dense block field below holding counters of 6, 28, 24 and 28. The lever is the only thing letting blocks travel sideways between the outer trays, and it has to be in the right position before the field starts emptying. That field is the shortest part of the solve and the easiest place to waste a block, so plan the first ten moves before you take one.
Level 912
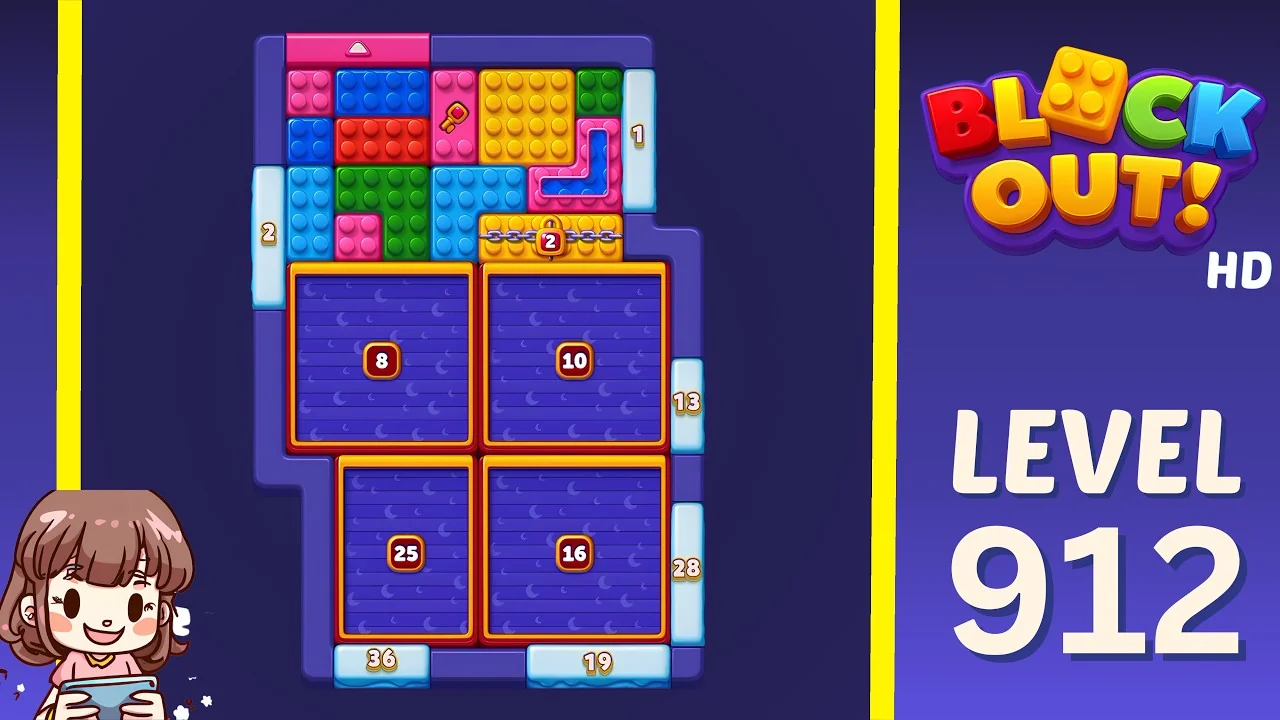
Open the Level 912 walkthrough or watch the video solution on YouTube.
Four trays in a 2x2 grid — 8 and 10 on top, 25 and 16 underneath — with a chained 2-counter gate between them and a pink slider along the top edge. The gate is the trap: it opens once, takes two blocks and then seals the connection between the upper and lower trays for the rest of the solve. Clear the 25 while both halves of the board are still reachable, and do not spend the gate on the first two blocks that happen to fit.
Level 913
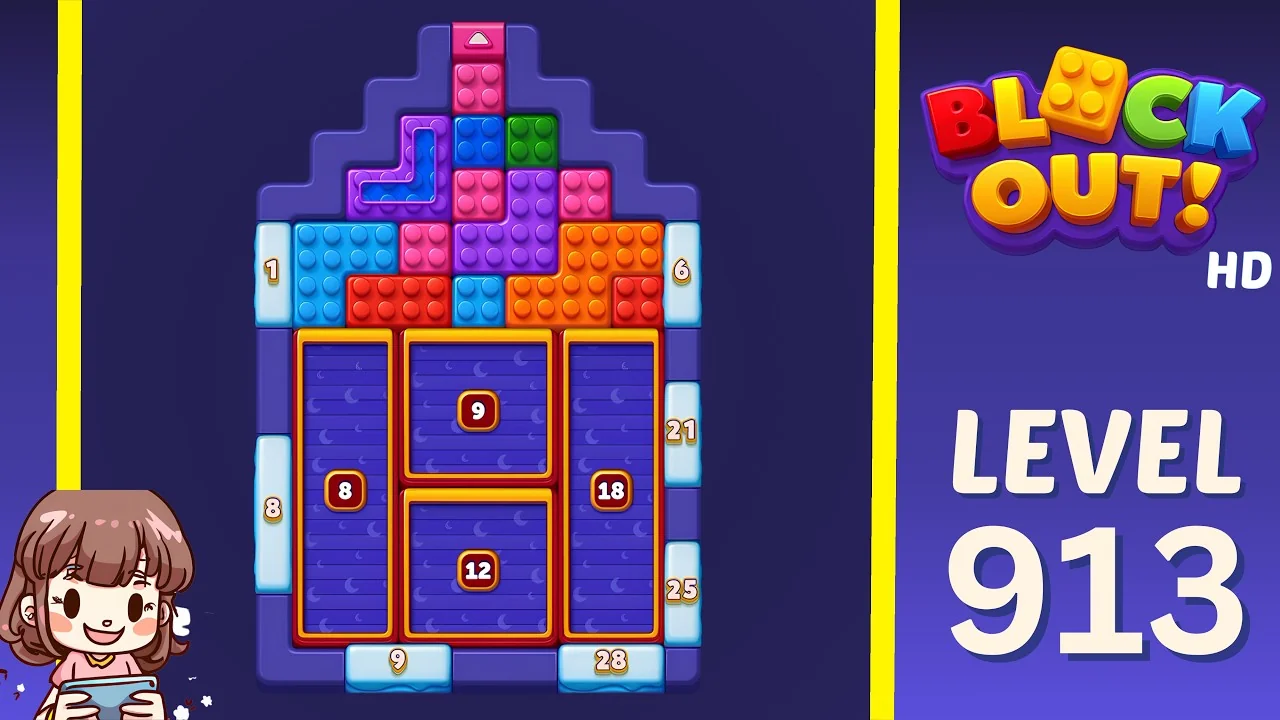
Open the Level 913 walkthrough or watch the video solution on YouTube.
The current end of the library is a stepped board: a pink slider at the peak, side counters at 1, 6, 21, 8 and 25, and four tall trays at 9, 8, 18 and 12 filling the lower half. The narrow stepped crown above the trays means blocks enter the tray area from a single point, and the 25-counter at the bottom right wants more blocks than the crown can deliver quickly. Work the small 1 and 6 counters early so they are gone before the crown closes.
What to watch for on these boards
The video is a verified solve, not a script. The useful part is the shape of the board:
- The door beats the tray. A tray count tells you how much it needs, not whether you can reach it.
- Wide trays finish first. A tray spanning the board catches almost everything that passes.
- One-use gates need a plan. Any gate that seals itself should be spent on the block you cannot place elsewhere.
- Sliders change the map. Move a slider before the field empties, not after.
- Restart without guilt. If no block has a tray that will take it, one more nudge will not make one.
How to use the walkthroughs
Every level from 908 to 913 has its own page with the board preview, difficulty rating and embedded video. A method that holds up on Expert boards:
- Watch only up to the first tray completing.
- Restart and replay that opening yourself.
- Keep going alone until you stall.
- Rewatch from the point your route went wrong, not from the start.
Browse all Block Out levels for the full library, or go back to the 902-907 log if you are still working through the previous batch.