Walkthrough editors
Block Out Levels 914-919: Six Expert Boards That Stack Trays Above the Block Field
Block Out Levels 914-919: six Expert boards with stacked and overhead trays, board previews and video solutions for each level.
Related video walkthroughs
The library stops at Level 919 now. 914 through 919 went up as one batch, all six rated Expert, and every one of them has a video walkthrough on the site and on YouTube. The previous batch was 908-913, so this picks up exactly where that run ended.
Where the last batch spread its trays around the frame, this one stacks them. On every board here at least one tray sits directly above the block field, sometimes two or three deep, and the blocks have to travel straight up through a one-width gap to reach it. That makes the vertical space the real constraint: a filled tray overhead does not just remove a target, it blocks the lane everything else was using.
Levels 914-919 at a glance
| Level | Difficulty | Walkthrough | Video |
|---|---|---|---|
| Level 914 | Expert | Open the guide | Watch |
| Level 915 | Expert | Open the guide | Watch |
| Level 916 | Expert | Open the guide | Watch |
| Level 917 | Expert | Open the guide | Watch |
| Level 918 | Expert | Open the guide | Watch |
| Level 919 | Expert | Open the guide | Watch |
The six newest boards
Each entry below has the board preview, a link to its own page and the video solution. Watch the video only as far as the first tray completing, then restart and replay that part yourself before watching the rest.
Level 914
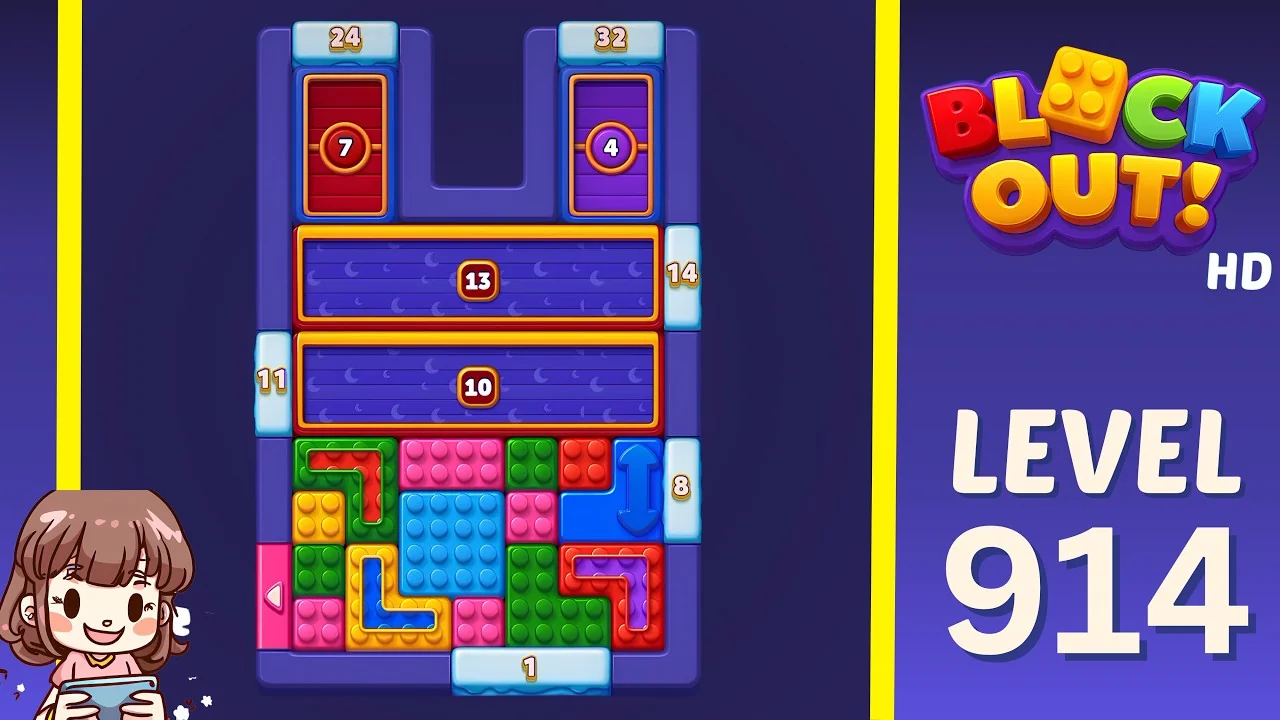
Open the Level 914 walkthrough or watch the video solution on YouTube.
Two tall vertical trays stand side by side at the top, 24 on the left and 32 on the right, with a U-shaped notch cut between them. Underneath sit two long horizontal trays, 13 on the outside and 10 nested inside it, and the whole block field is pressed into the bottom third of the frame. The 32 is the largest single number on the board and the slowest tray to finish, so it wants the first steady stream of blocks; the inner 10 closes quietly and gives you nothing back once it is done. Small counters at 11, 14 and 8 around the sides and a single 1 at the base are where the leftovers go, so save one block for the 1 and treat it as the final move.
Level 915
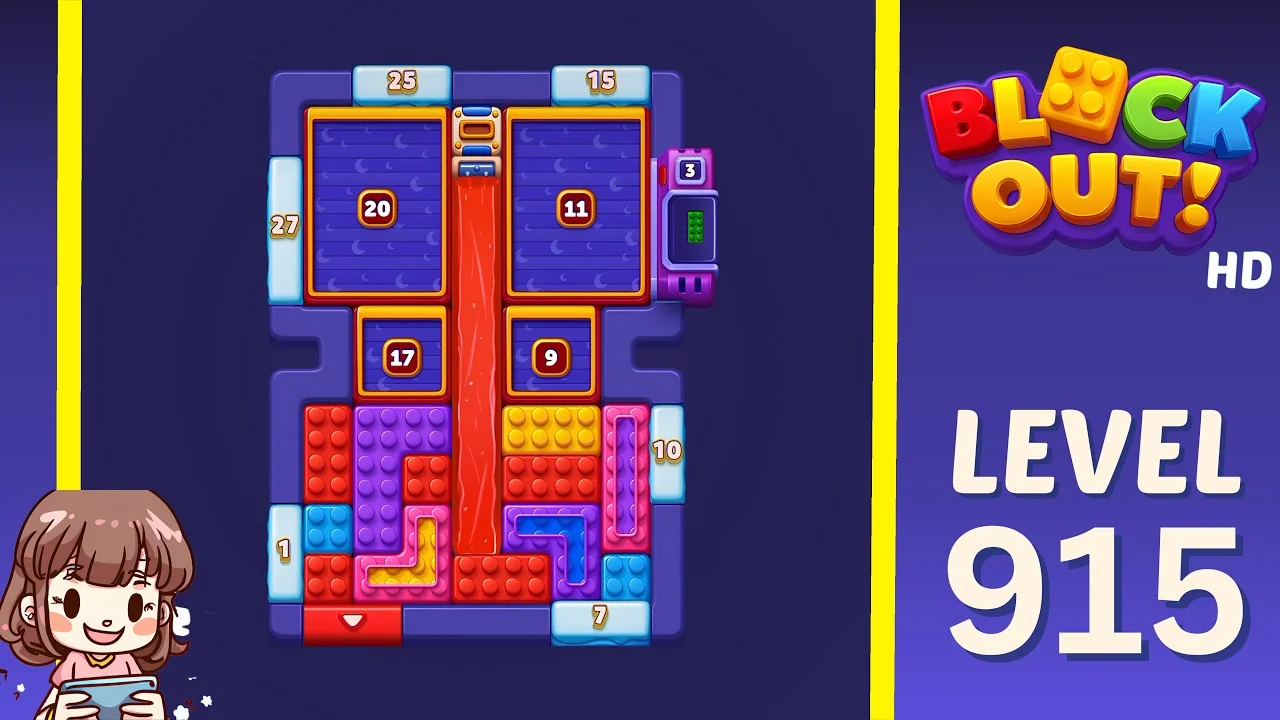
Open the Level 915 walkthrough or watch the video solution on YouTube.
Two big trays, 20 and 11, fill the top half with counters reading 25 and 15 above them, and a narrow channel runs straight down between the pair all the way into the block field. Nothing reaches either top tray except through that channel, and it only takes one block at a time. The middle row adds a 17 and a 9, with a small 3 locked inside a purple gate housing on the right, and counters at 27, 10, 1 and 7 sit around the edges. The 27 on the left is the second-biggest number and the easiest to forget while you are babysitting the channel, so check it before every drop.
Level 916
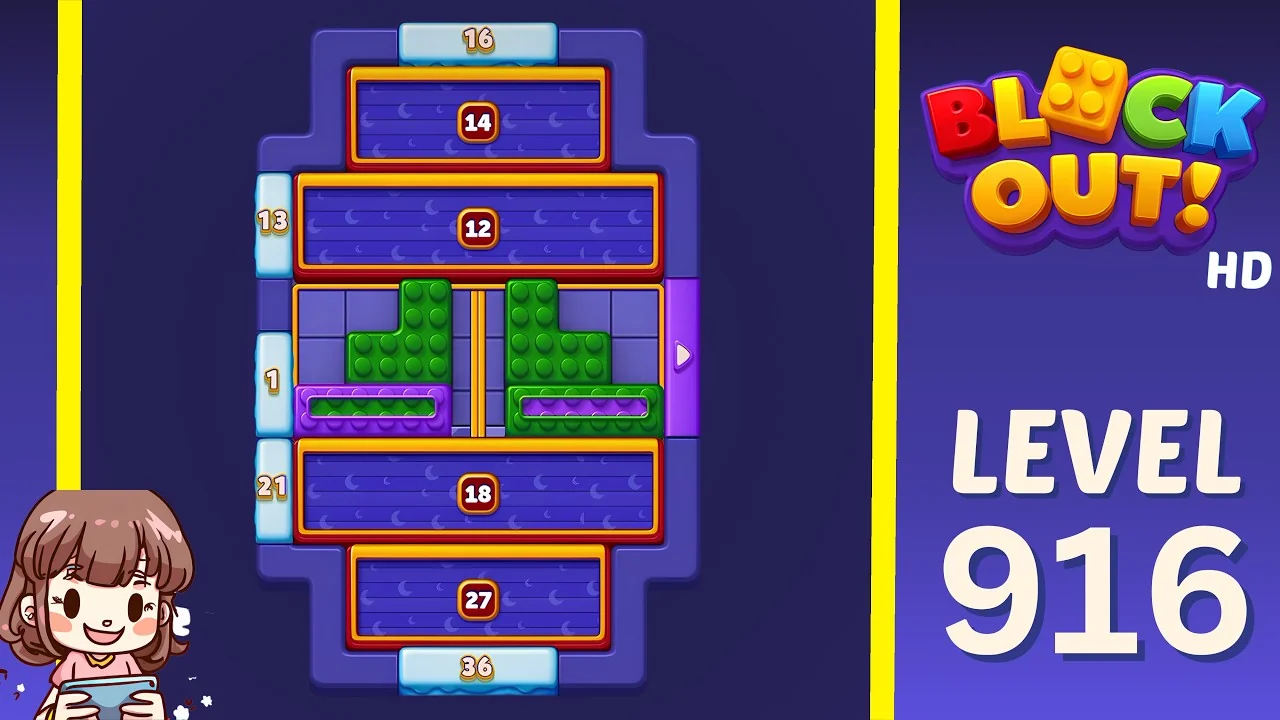
Open the Level 916 walkthrough or watch the video solution on YouTube.
The most obviously stacked board of the six: wide horizontal trays at 14 and 12 above a middle block chamber, then 18 and 27 below it, with counters at 16 on top, 13 and 21 on the left and 3 at the base. A purple slider on the right has to be displaced before the chamber opens, and the chamber itself is split by one-width gates that only let a single block width through. Order matters here more than speed: fill 12 before 14, because the 14 tray sits above it and its lane cuts across the route down. The 27 at the bottom is the last thing to finish and should be fed continuously rather than in one burst at the end.
Level 917
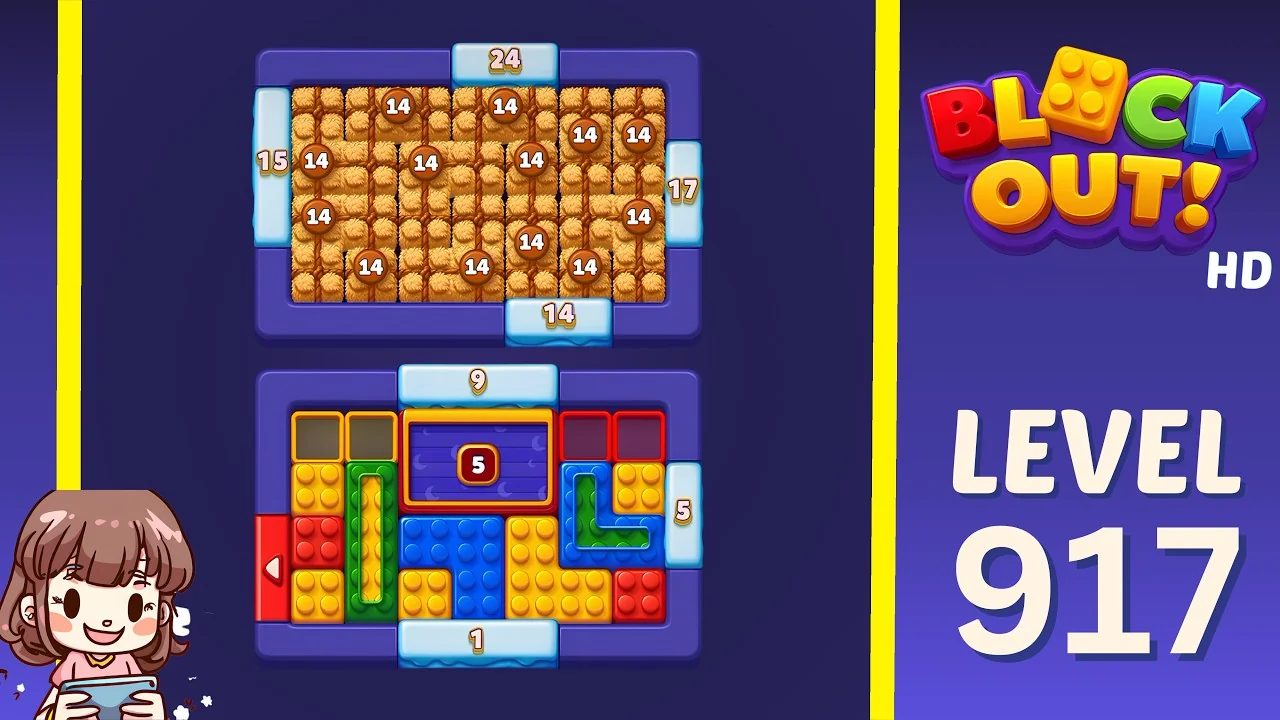
Open the Level 917 walkthrough or watch the video solution on YouTube.
This one is really two boards stacked in one frame. The upper half is a dense field of bronze blocks, every one of them stamped 14, walled in by trays reading 24 on top, 15 on the left, 17 on the right and 14 at the base. The lower half is a separate small board with a purple 5-tray in the middle, counters at 9, 5 and 1, plus a green vertical slider and two empty red slots at the top corners. Do not try to solve both halves at once. Clear the lower board first, since it is small and self-contained, then turn to the bronze field and work it from the outer edges inward so the 14 trays keep a lane open.
Level 918
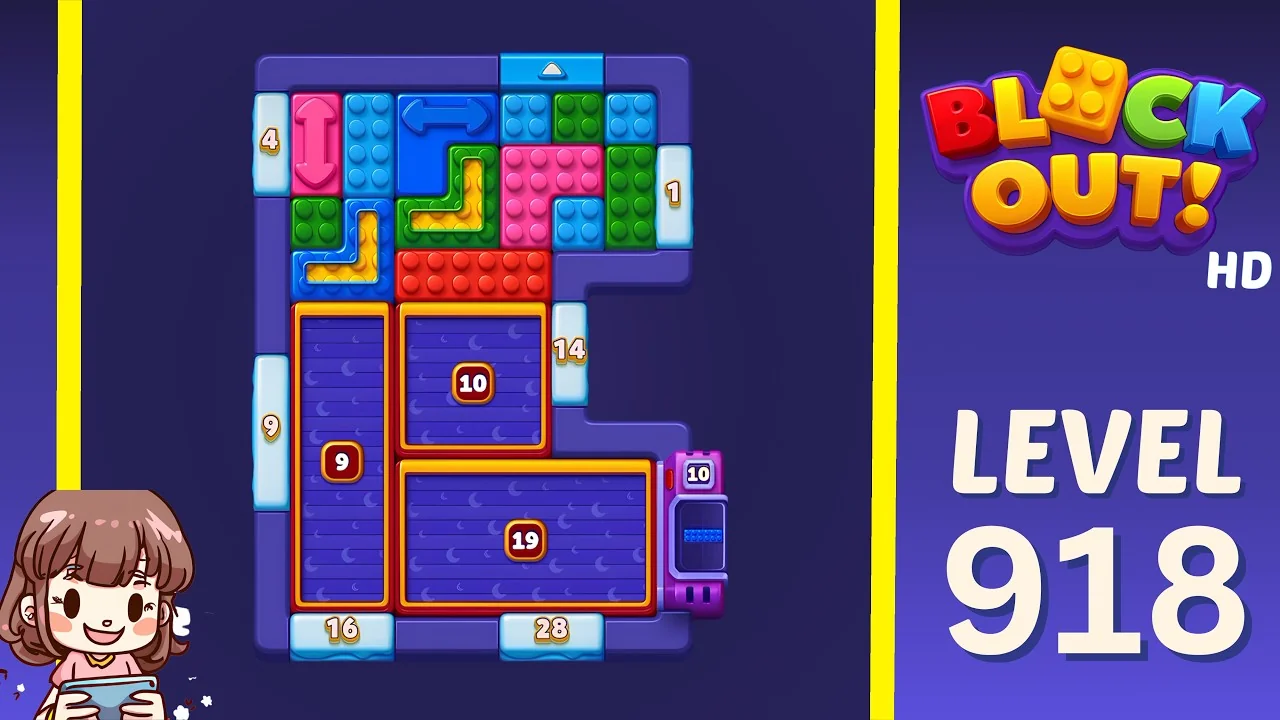
Open the Level 918 walkthrough or watch the video solution on YouTube.
Almost the whole upper frame is block mass, with an up arrow at the top edge marking the only exit, and the trays are crowded into the lower right: a tall 9 on the left, a 10 beside it, and a long 19 running along the bottom. Counters at 4 and 1 sit high on the sides, 14 and 9 in the middle, and 16 and 28 along the base, with a purple 10 gate box on the right edge. The 28 and the 19 are your two big sinks and they are also the two most awkward to reach, so open the lane to them early. The 1 near the top right is a trap: it is reachable first and finishes first, which closes the shortest route out of the block mass.
Level 919
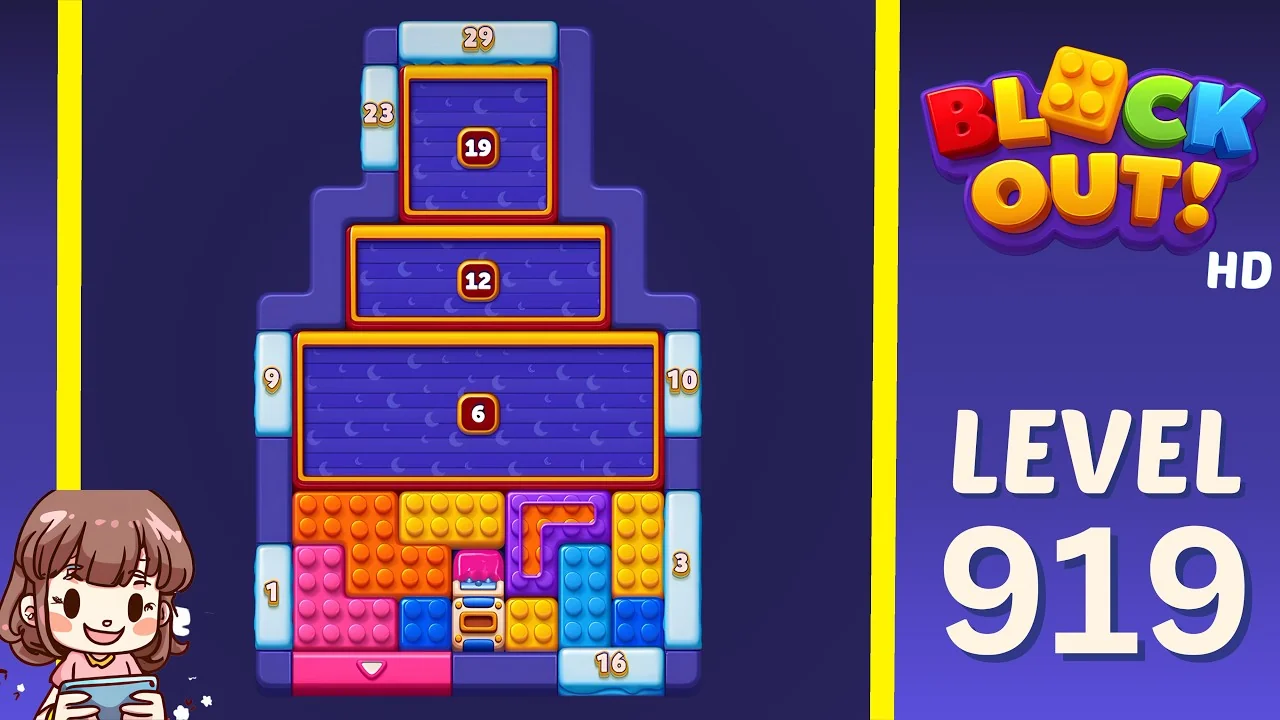
Open the Level 919 walkthrough or watch the video solution on YouTube.
The current end of the library, and the tidiest of the batch: a stepped pyramid of trays with 19 at the peak under a 29 counter, 12 beneath it, a wide 6 below that, and the block field at the base ringed by counters at 9, 10, 1, 3 and 16. A pink slider at the bottom left has to travel down before the gate in the centre opens. Work from the bottom up. The 6 in the middle is wide and forgiving and should stay open as your default landing spot while you dig out the blocks that the 19 and 12 need, and the 16 at the base is the last tray you touch, not the first.
What to watch for on these boards
The video is a verified solve, not a script. The useful part is the shape of the board:
- Overhead trays block lanes. A tray that fills stops being a target and starts being a wall.
- Feed the slow tray first. The biggest number takes the longest, and it is usually the one sitting highest.
- Clear the small side board first. When a level is split into two sections, the self-contained one is free progress.
- Reachable does not mean useful. The nearest small tray is often the one that seals your route out.
- Restart without guilt. If no block has a tray that will take it, one more nudge will not make one.
How to use the walkthroughs
Every level from 914 to 919 has its own page with the board preview, difficulty rating and embedded video. A method that holds up on Expert boards:
- Watch only up to the first tray completing.
- Restart and replay that opening yourself.
- Keep going alone until you stall.
- Rewatch from the point your route went wrong, not from the start.
Browse all Block Out levels for the full library, or go back to the 908-913 log if you are still working through the previous batch.