Walkthrough editors
Block Out Levels 944-948: Twin Trays, a Tiered Tree and One Split Bottom Band
Block Out Levels 944-948: three twin-tray boards with thin bottom fields, one inverted three-tray layout and a stepped tree frame, plus board previews and video solutions for every level.
Related video walkthroughs
The library now runs to Level 948. 944 through 948 went up as one batch, all five rated Expert, and each one has a page on the site plus a video solution on YouTube. The previous batch was 938-943, so this picks up where that run ended.
The 930s closed by shrinking the field into a single strip and letting two or three trays own the rest of the frame. This batch keeps the trays large but moves the field to one end, and then plays with the frame itself. Three boards (944, 946, 948) use the same skeleton: two tall trays standing side by side across the top half, and every remaining block squeezed into a band along the bottom. 945 is that idea turned upside down, with the field on top and three trays stacked underneath. 947 is the odd one out, a stepped outline that narrows as it rises, so the width of the field changes with every row.
The interesting change is what happened to the bottom band. On 944 it is a plain strip, on 946 the frame cuts a notch up into it and splits the field in two, and on 948 a small striped dispenser sits in the middle of it. That difference decides whether the two side trays can be fed from a shared pool of blocks or have to be filled from separate halves.
Levels 944-948 at a glance
| Level | Difficulty | Walkthrough | Video |
|---|---|---|---|
| Level 944 | Expert | Open the guide | Watch |
| Level 945 | Expert | Open the guide | Watch |
| Level 946 | Expert | Open the guide | Watch |
| Level 947 | Expert | Open the guide | Watch |
| Level 948 | Expert | Open the guide | Watch |
The five newest boards
Each entry below has the board preview, a link to its own page and the video solution. Watch only as far as the first tray completing, then restart and replay that part yourself before watching the rest.
Level 944
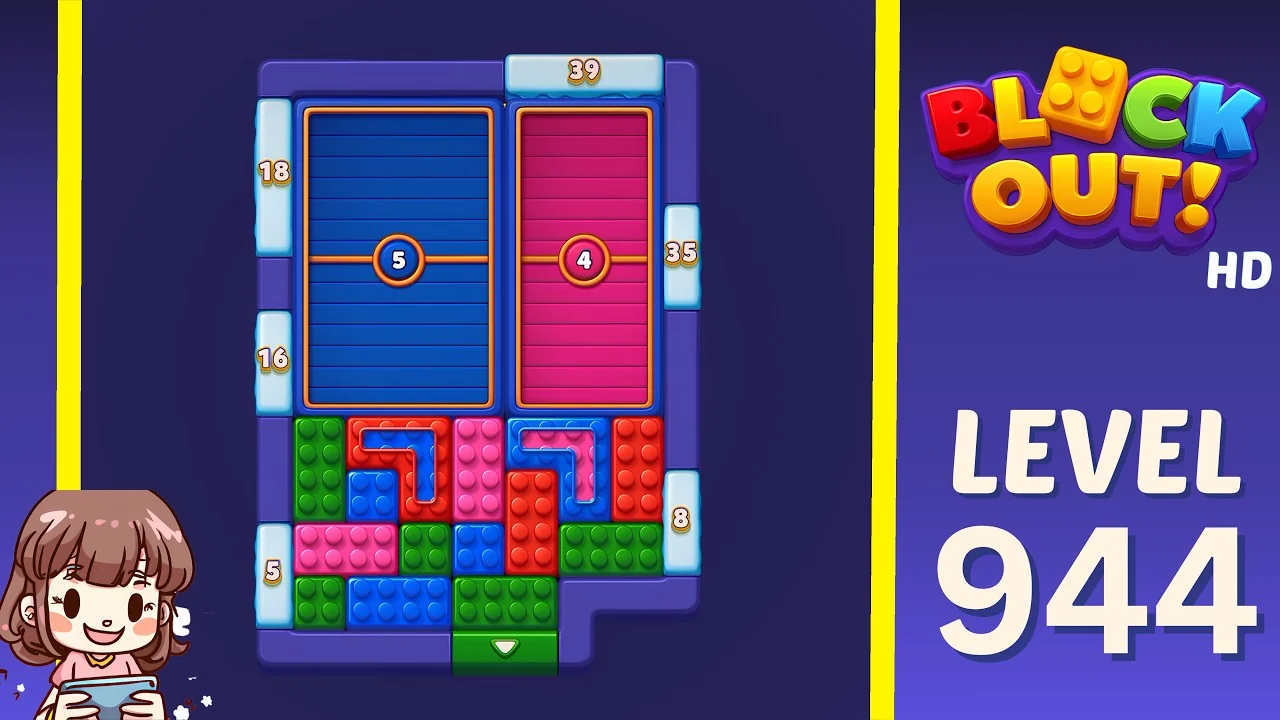
Open the Level 944 walkthrough or watch the video solution on YouTube.
Two tall trays fill the top two thirds, a blue one marked 5 on the left and a pink one marked 4 on the right, each sitting inside an orange frame with a solid bar across its middle. The field is the band underneath: green bricks along the left edge, red and blue stacked in the middle, pink columns and a blue L on the right, a white down arrow gate on the bottom edge and a step cut out of the frame in the bottom left corner. The counters read 39 across the top, 18 and 16 down the left, 35 down the right, and 5 and 8 along the bottom. Both trays are small, 5 and 4, so this is not a board where one tray swallows the field; it is a board where the band has to be emptied in an order that keeps feeding both. Open the 5 and the 4 early, then let the 39 across the top do the heavy work on the leftovers.
Level 945
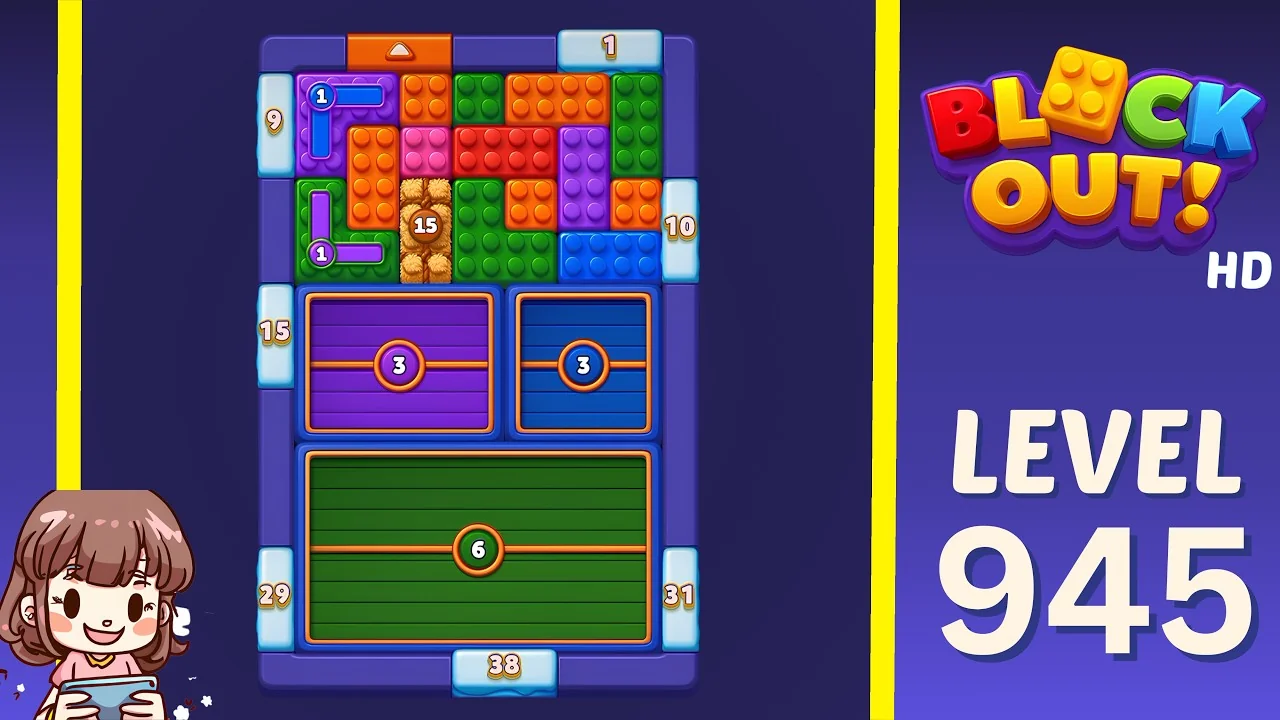
Open the Level 945 walkthrough or watch the video solution on YouTube.
The inverse of 944. The field sits at the top, a dense grid of orange, green, red, pink and purple bricks with a brown tray marked 15 embedded in the left half, a blue L and a purple L as sliders and a 1 hanging off the top of one of them, and an orange up arrow gate on the top edge. Below the field are three trays side by side: a purple one marked 3, a blue one marked 3, and a wide green shelf marked 6 that spans the whole width under both of them. The counters read 1 on top, 9 and 15 and 29 down the left, 10 and 31 down the right, and 38 along the bottom. The 6 is the only large tray and it cannot start until a block reaches it from above, so the two 3s take everything the middle of the field produces. Feed the 15 and the 3s first, keep the 6 for the wide bricks that only fit across the bottom, and treat the 1 on the slider as a last-resort outlet.
Level 946
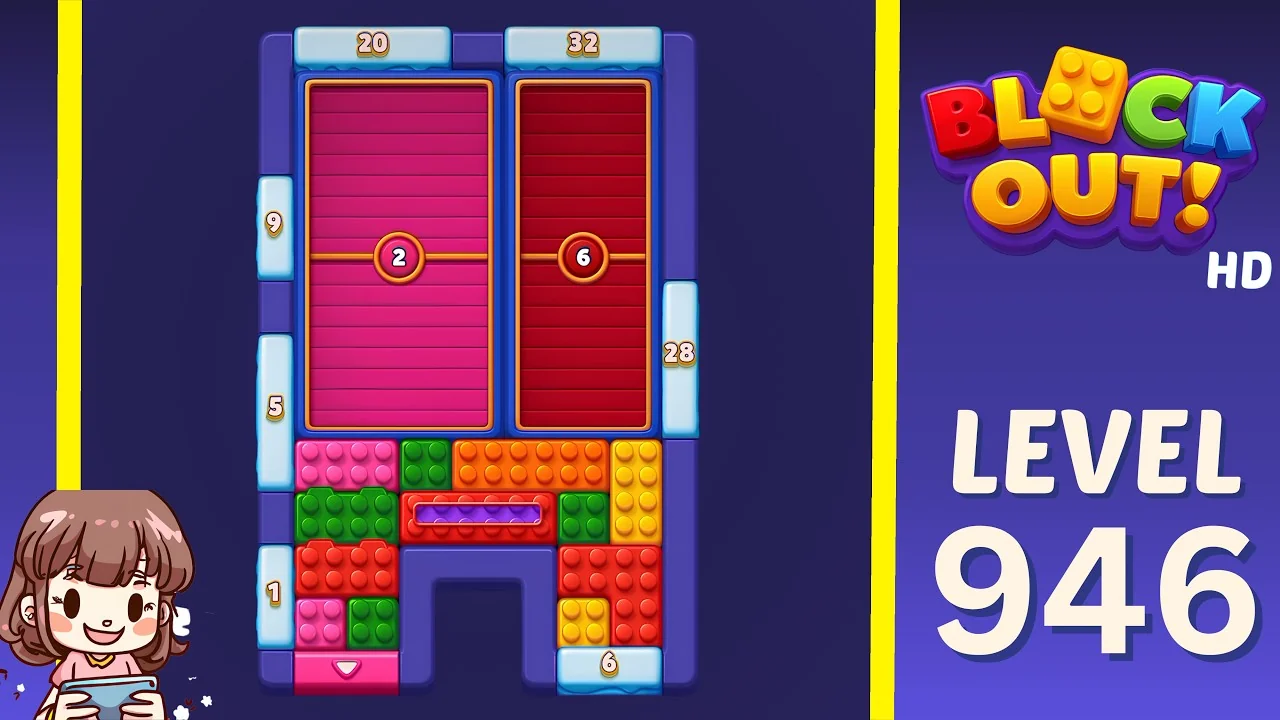
Open the Level 946 walkthrough or watch the video solution on YouTube.
Two tall trays across the top, pink marked 2 on the left and dark red marked 6 on the right, both running almost the full height of the upper frame. The field is the band at the bottom, and the frame cuts a deep U-shaped notch up into it, so the band is no longer one strip: the left side holds pink and green and red bricks, the right side holds orange and yellow and red, and a purple horizontal slider bridges them across the middle. A pink down arrow gate sits at the bottom of the left side and a blue bar at the bottom of the right. The counters read 20 and 32 across the top, 9 and 5 and 1 down the left, 28 down the right and 6 along the bottom. The notch is the whole puzzle: blocks on the left can never reach the right tray, so the 2 has to be filled from the left half and the 6 from the right. Open the 20 into the left tray before the 1 on that side is spent.
Level 947
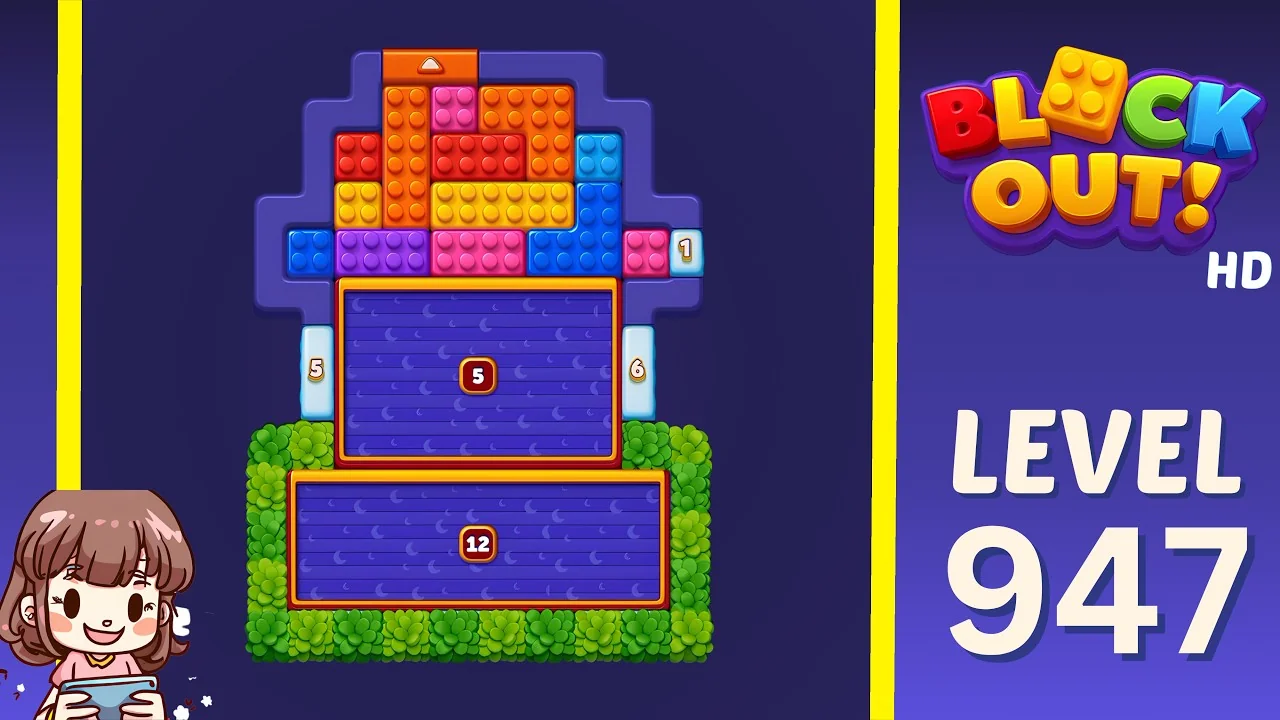
Open the Level 947 walkthrough or watch the video solution on YouTube.
A stepped frame that narrows as it rises, like a tiered tree, with the field built into the steps and two purple trays stacked in the trunk below. The upper tray is a narrow one marked 5 sitting inside a red frame, the lower tray a wide one marked 12 that spans the full base, and green bushes decorate the corners outside the frame. The field rows climb the steps: red and yellow on the left tiers, orange and blue and purple across the top, pink and blue at the base of the trunk, with an orange up arrow gate at the very top. The counters read 5 and 6 on the two sides of the trunk and 1 on the right step. Because the frame narrows upward, the top rows only hold a few blocks each, and each one removed changes the reachable width of the row below. Work the 12 first from the wide base, save the 5 for the narrow upper tray, and use the 1 on the right step as the finish.
Level 948
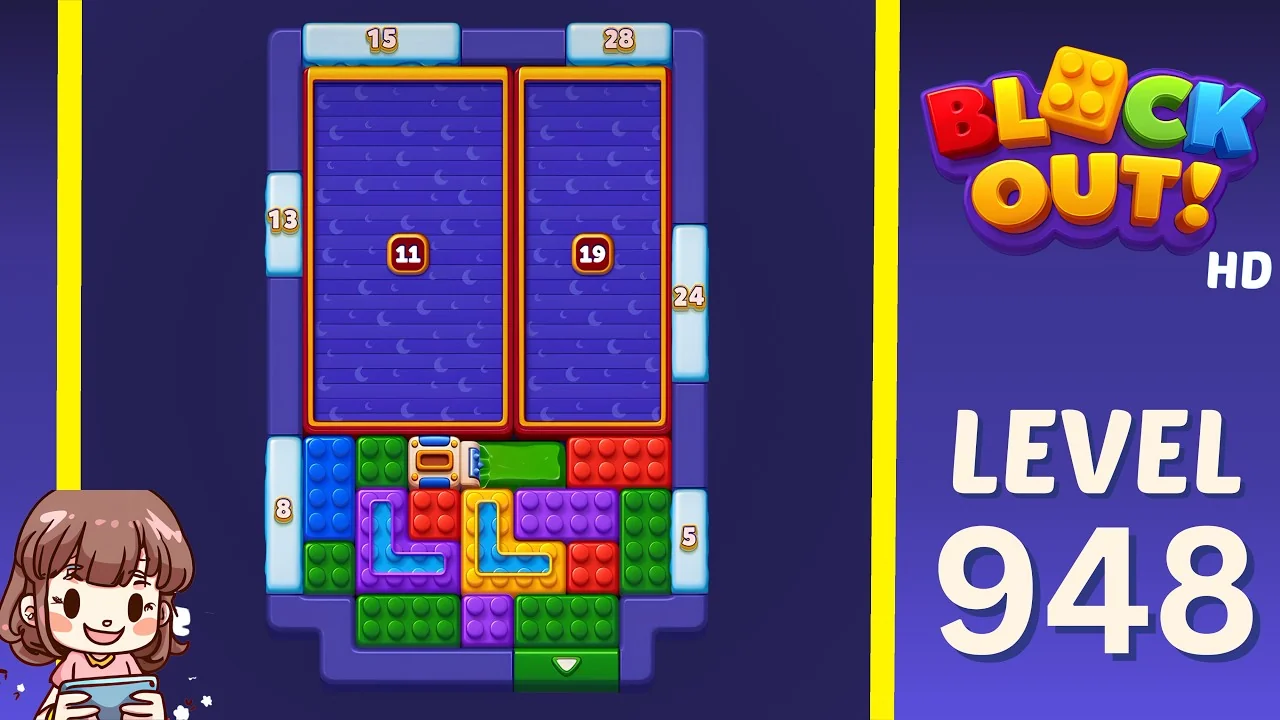
Open the Level 948 walkthrough or watch the video solution on YouTube.
The twin-tray skeleton again, and the closest relative of 944. Two tall purple trays stand side by side across the top, marked 11 on the left and 19 on the right, each in an orange frame with a bar across the middle. The field is the band underneath, filled with green, blue, red and purple bricks, with a small striped dispenser marked 8 in the middle of the top row and a green down arrow gate in the bottom centre. The frame steps out at the bottom left and bottom right, so the band is wider at the base than at the top. The counters read 15 and 28 across the top, 13 down the left, 24 down the right, and 8 and 5 along the bottom. This is the largest pair of trays in the batch, 11 and 19, and the field is the thinnest: 30 blocks for 30 tray slots. There is no slack. Fill the 11 first from the left of the band and let the 19 take everything that falls to the right, and never spend the 5 on the right edge before the last purple brick moves.
What to watch for on these boards
The video is a verified solve, not a script. The useful part is the shape of the board:
- Twin trays are two separate puzzles. When two tall trays stand side by side above a band, neither one can borrow blocks from the other side; the divider is the frame, not a block.
- A notch in the frame changes the route, not just the artwork. On 946 the U-shaped cut leaves two fields and one slider bridge, so the opening tray has to be chosen per side.
- A stepped frame changes the width of the field. On 947 every row that clears makes the row below reachable in a new place, so re-read the counters after each row, not once at the start.
- A thin field with small trays is a counting puzzle. When the blocks and the tray slots are close to equal, one wasted drop usually ends the run.
- The 1 and 2 counters are the last moves. On 945 and 946 they sit on sliders and gates that stop being useful the moment you spend them.
How to use the walkthroughs
Every level from 944 to 948 has its own page with the board preview, difficulty rating and embedded video. A method that holds up on Expert boards:
- Watch only up to the first tray completing.
- Restart and replay that opening yourself.
- Keep going alone until you stall.
- Rewatch from the point your route went wrong, not from the start.
Browse all Block Out levels for the full library, or go back to the 938-943 log if you are still working through the previous batch.