Walkthrough editors
Block Out Levels 955-960: The Field Moves to the Top, Then to the Floor
Block Out Levels 955-960: the field climbs above the trays on 955 and 957, sits in the middle on 956 and 958 with two empty slots beneath it, and drops to the floor on 960, with previews and video solutions for every level.
Related video walkthroughs
The library now runs to Level 960. 955 through 960 went up as one batch, all six rated Expert, and each one has a page on the site plus a video solution on YouTube. The previous batch was 949-954, so this picks up where that run ended.
The 950s ended by spreading trays around the field on every side, and 953 and 954 made the small side dispensers the whole puzzle. This batch does something simpler and more uncomfortable: it moves the field. On 955, 957 and 959 the field sits at the very top of the frame with the trays beneath it. On 956 and 958 it sits in the middle, with outlets both above and below. On 960 the layout is upside down, the field is the floor of the board and all three trays hang over it. After a run of batches where the field was a strip at one end and the trays were the story, here the field position is what decides the route.
The second thread is the full-width tray with a bar through it. On 955 it is a purple tray marked 2 directly under the field, on 957 two blue trays marked 9 and 15 stacked below the field, on 958 a pink tray marked 3 above it and on 959 a wooden tray marked 2 in the middle. These trays are wide enough to look like the main outlet, and on every board in this batch they are the buffer, not the opening move.
Levels 955-960 at a glance
| Level | Difficulty | Walkthrough | Video |
|---|---|---|---|
| Level 955 | Expert | Open the guide | Watch |
| Level 956 | Expert | Open the guide | Watch |
| Level 957 | Expert | Open the guide | Watch |
| Level 958 | Expert | Open the guide | Watch |
| Level 959 | Expert | Open the guide | Watch |
| Level 960 | Expert | Open the guide | Watch |
The six newest boards
Each entry below has the board preview, a link to its own page and the video solution. Watch only as far as the first tray completing, then restart and replay that part yourself before watching the rest.
Level 955
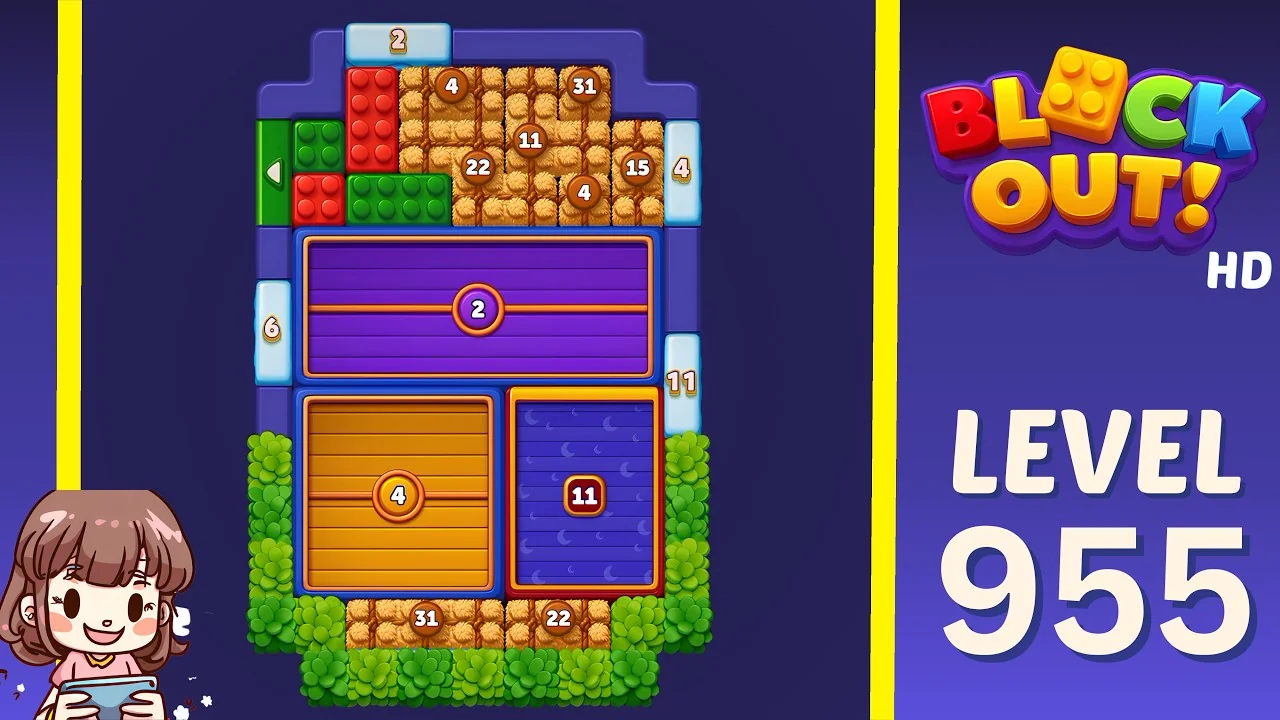
Open the Level 955 walkthrough or watch the video solution on YouTube.
The field is the top block: tan, red and green bricks, a green left arrow gate on its left edge, a mint dispenser marked 4 clipped to its right edge, and a small mint tray marked 2 above it on the frame. Under the field sits a wide purple tray marked 2 with a bar across the middle, and under that two trays share the bottom row, an orange one marked 4 on the left and a blue one marked 11 on the right. Two more small dispensers hug the outer frame, marked 6 on the left and 11 on the right. The counters read 4, 31, 11, 22, 4 and 15 around the field, with 31 and 22 along the bottom. The field is on top of everything, so nothing below it can be reached without going through the wide purple tray first. That tray is the gate: fill it late, and the 4 and the 11 at the bottom have to be fed from the leftovers rather than from the first pass.
Level 956
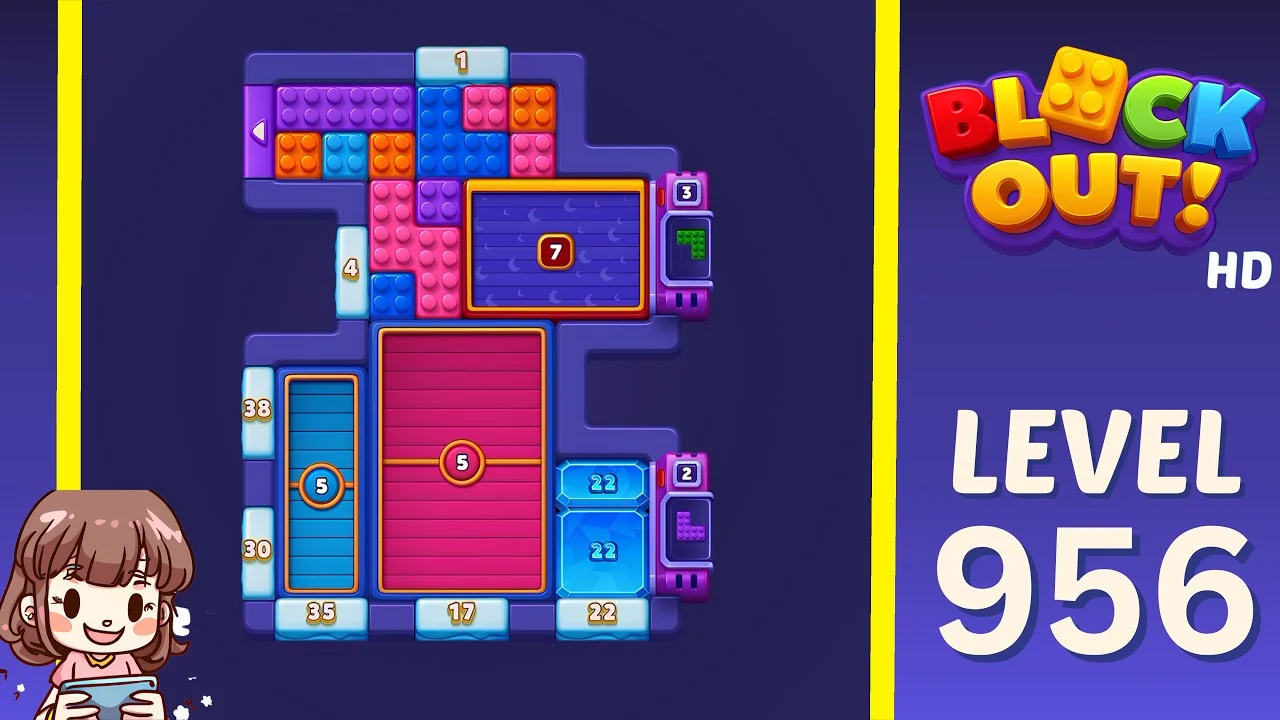
Open the Level 956 walkthrough or watch the video solution on YouTube.
A two-storey frame with a stepped shoulder on the right. The upper storey holds the field, purple, blue, pink and orange bricks with a purple left arrow slider on the outer left, a mint tray marked 1 on top, a blue tray marked 7 in an orange frame to the right of the field with a purple dispenser marked 3 outside it, and a small mint tray marked 4 under the field's left corner. The lower storey is all trays: a tall blue one marked 5 on the left, a large pink one marked 5 in the centre inside an orange frame, two blue trays marked 22 stacked on the right, and a purple dispenser marked 2 outside the right edge. The counters read 4 and 30 down the left, 38 on the left shoulder, and 35, 17 and 22 along the bottom. The two storeys do not share a pool, which is the point of the step: the 7 and the 3 are fed from the upper field, the 5, 5, 22 and 22 from the lower. The tall blue 5 is the narrow chute between them, and it has to stay open long enough for the lower half to start.
Level 957
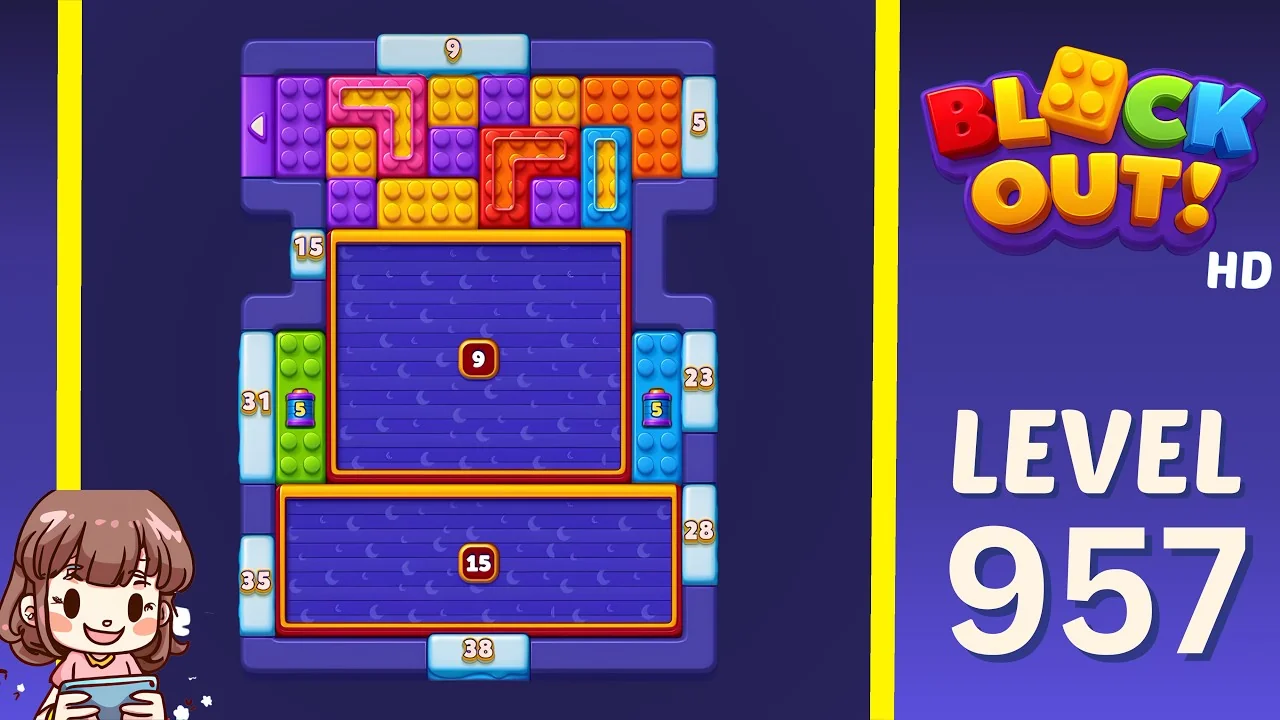
Open the Level 957 walkthrough or watch the video solution on YouTube.
Two full-width blue trays stacked under a field, both in orange frames, the upper marked 9 and the lower marked 15. The field is at the top: purple, orange, yellow and red bricks, a purple left arrow slider on its left edge, a mint tray marked 9 above it and a mint tray marked 5 on the right. Between the field and the bottom tray, the frame narrows into two flanks, each carrying a small purple dispenser marked 5. The counters read 15 above the upper tray, 31 and 35 down the left, 23 and 28 down the right, and 38 along the bottom. This is the cleanest board in the batch and also the most punishing if you open the wrong tray: the 9 and the 15 span the whole width, so whichever one you start will take blocks from every column at once. Both 5 dispensers sit in the narrow waist, which means they only see blocks that pass the waist. Clear them in the first third of the run or not at all.
Level 958
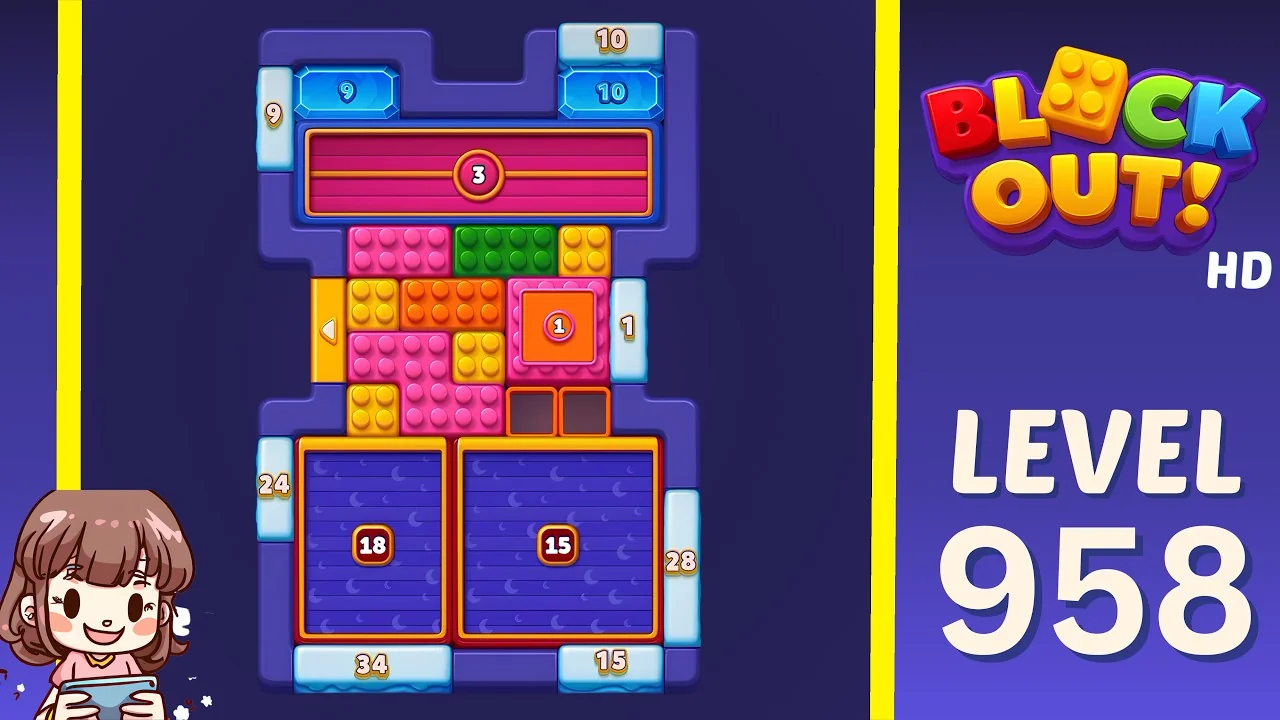
Open the Level 958 walkthrough or watch the video solution on YouTube.
The board is split top and bottom by the field. At the top, two blue trays marked 9 and 10 sit side by side with a column of the frame between them, and below them a wide pink tray with a bar, marked 3. The field is in the middle: pink, green, yellow and orange bricks, a yellow left arrow gate on its left edge and a small pink tray marked 1 attached to its right side. Directly under the field are two empty two-cell slots built into the frame, dark and unlabelled. The bottom row is two blue trays marked 18 and 15. The counters read 9 at the top left, 10 at the top right, 1 on the right, 24 and 28 on the flanks, and 34 and 15 along the bottom. The pair of empty slots is the whole board: four cells of capacity that accept a block and then stop, and they sit underneath the field where the widest part of the field passes over them. Fill them by accident and the middle of the board loses its exit.
Level 959
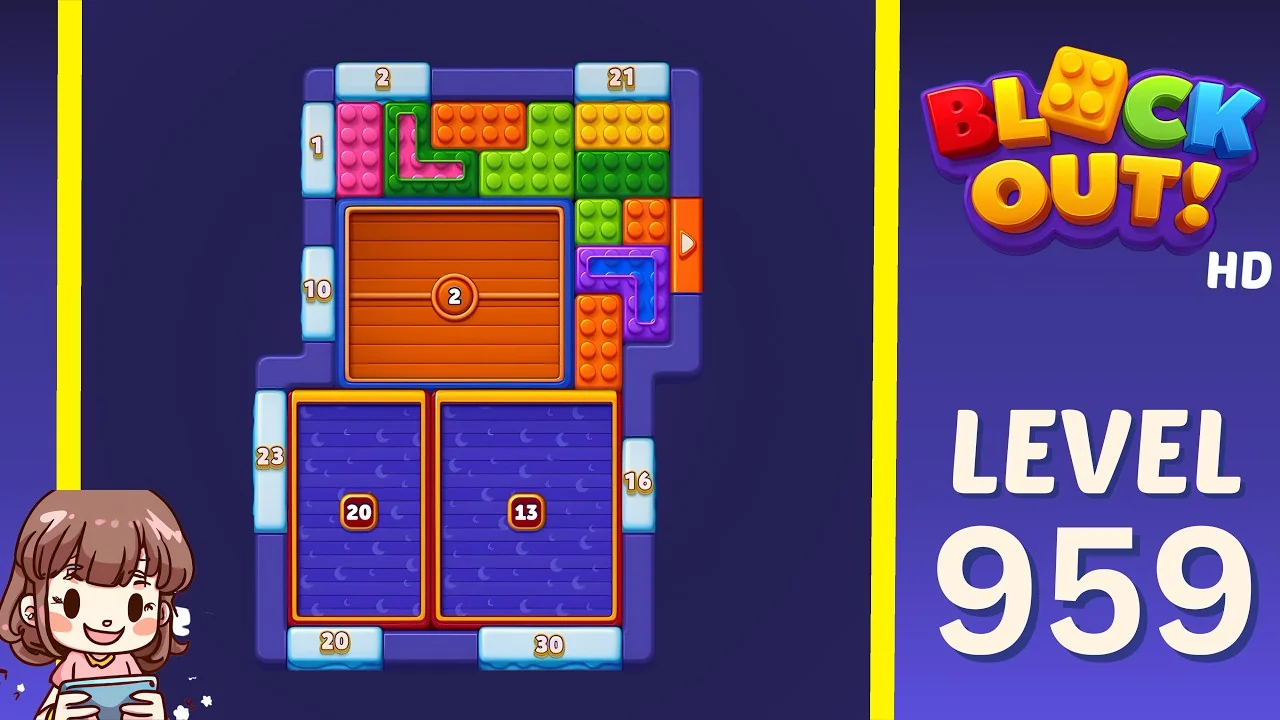
Open the Level 959 walkthrough or watch the video solution on YouTube.
The field occupies the top third: pink, green, orange and yellow bricks, a green cross-shaped gate in its upper left corner, an orange right arrow gate on the outer right edge and a small purple L beside it. Below the field is a wide wooden tray marked 2 with a bar through the middle, and below that two blue trays marked 20 and 13 side by side. Small counters line the frame, 1 and 2 on the left, 21 at the top right, 10 and 23 down the left, 16 on the right, and 20 and 30 along the bottom. Two of the eight counters on this board are gates rather than trays, the green cross and the orange arrow, and they open the field sideways rather than downward. With one wide tray between the field and the bottom pair, the route is short: open the 2 early, use the 20 and the 13 as the real storage, and treat the side gates as the way to keep the field moving while both bottom trays are still half empty.
Level 960
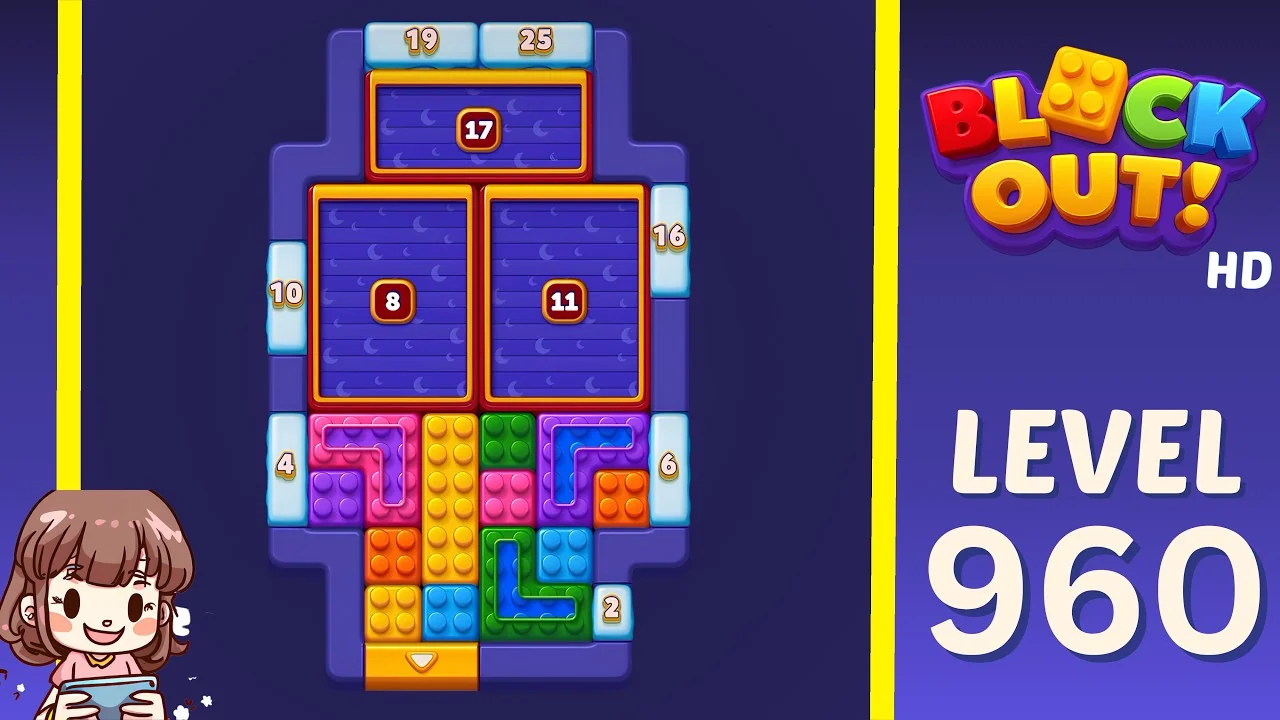
Open the Level 960 walkthrough or watch the video solution on YouTube.
The batch ends upside down. The field is the floor of the board: purple, pink, orange, green and blue bricks with a yellow down arrow gate on the bottom edge. Everything else is above it. A blue tray marked 17 spans the top, and below it two blue trays marked 8 and 11 stand side by side inside orange frames. The counters read 19 and 25 across the top, 10 down the left, 16 down the right, 4 and 6 on the flanks and 2 low on the right. The yellow gate is on the outside edge of the field, so the field can be opened away from the board rather than into it, and that is the only reason a field this small can feed three trays above it. Open downward first, let the 8 and the 11 take the top rows, and keep the 17 for whatever the flanks cannot absorb.
What to watch for on these boards
The video is a verified solve, not a script. The useful part is the shape of the board:
- Field position is the route. On 955, 957 and 959 the field is above the trays; on 960 it is below them. Where the field sits tells you which tray is a chute and which is a storehouse.
- A full-width tray with a bar is a buffer. The 2 on 955, the 9 and 15 on 957 and the 3 on 958 all look like the main outlet and none of them should be opened first.
- Small dispensers live in the narrow parts. The 3 on 956, both 5s on 957, the 1 on 958 and the 4 and 6 on 960 sit where the frame narrows, so they only accept blocks for part of the run.
- Empty slots are finite. The two dark trays under the field on 958 hold two blocks each and then stop. Count them before you start clearing the middle.
- A gate on the outer edge is an escape hatch. The yellow gate on 960 and the orange arrow on 959 let the field empty outward, which is what keeps a small field able to feed three trays.
How to use the walkthroughs
Every level from 955 to 960 has its own page with the board preview, difficulty rating and embedded video. A method that holds up on Expert boards:
- Watch only up to the first tray completing.
- Restart and replay that opening yourself.
- Keep going alone until you stall.
- Rewatch from the point your route went wrong, not from the start.
Browse all Block Out levels for the full library, or go back to the 949-954 log if you are still working through the previous batch.